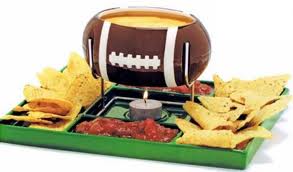
Let me say it up front. I am a serious, confirmed garlic-lover. Where people hold up their noses and scowl when garlic is mentioned, I embrace the bulb with the passion of a devout believer. I come from a culture where garlic is king. Count Dracula would have a hard time attacking us. Garlic (Latin name: Allium sativum) is a member of the onion family. It has been used throughout recorded history for both medicinal and culinary purposes. It is native to central Asia and has been around for 5,000 years. The ancient Egyptians were the first to cultivate it and it played an important role in their culture. The builders of the ancient pyramids were said to eat garlic to enhance their endurance and strength. Roman emperors were particularly fond of garlic. They used it an an antidote to poisons—something very popular at the time if you wanted to get rid of the top dog in the empire. The Spanish conquistadors used it as a preservative.
Garlic has great medicinal properties. It promotes the well being of heart function and helps maintain healthy blood circulation. One of its great health benefits is that it enhances the body’s immune cell activity. It helps regulate the body’s defenses against allergies; and helps loosen plaque from arterial walls. It also aids in regulating blood sugar levels. Not only that, it helps regulate the body’s blood pressure. So, if you have problems with high or low blood pressure, garlic can help to equalize it. The reason is that garlic contains the compound allicin, which not only lowers blood pressure, but also assists in regulating proper weight control. Garlic also reduces the risk of heart attacks and strokes. Studies have shown that two or three cloves a day have cut the risk of subsequent hearty attacks in half of heart patients. But most important of all, garlic contains germanium, an anti-cancer agent. Garlic had more of it than any other herb. Think of garlic as an anti-cancer food. All taken together, one can say that garlic is a powerful perfect natural antibiotic. As such it is effective against many bacteria, fungi and viruses. Back in the Middle Ages it was though to ward off the plague.
All the medicinal benefits aside, garlic is a wonderful seasoning. It adds aroma, taste and nutrition to foods. There is nothing better to give a dish that extra “oomph.” Yet for maximum flavor and nutritional benefits, always buy fresh garlic. Avoid garlic flakes, garlic powder and garlic paste. They ain’t as good culinarilly or otherwise. Buy garlic that is plumb and has an unbroken skin. Then simply squeeze the bulb between your fingers to check that it feels firm and is not damp. Avoid garlic that is soft, shriveled, moldy, or that has begun to sprout. Always store garlic in an uncovered or loosely covered container in a cool dark place. These days you can purchase garlic storage pots made of clay or marvel. They are perfect for this function. It’s not necessary to refrigerate garlic. And freezing raw garlic will reduce its flavor and change its texture.
The following is one of my favorite garlic recipes. It call for twelve cloves—that’s right: 12 cloves. Its an easy chicken dish for all us garlic fanatics out there.
CHICKEN WITH GARLIC SAUCE
1 broiler fryer chicken (2 1/2 to 3 pounds), cut up into serving-size pieces
1/3 cup olive oil
12 garlic cloves, peeled and sliced finely
2 tablespoons sesame oil
1/4 cup soy sauce
1/2 cup chicken broth
1. Heat olive oil over medium heat in a medium-size skillet or frying pan (I prefer cast iron). Add chicken pieces and stir-fry until brown on all sides.
2. Add garlic and cook for about 3 minutes more. Add sesame oil, soy sauce and chicken broth.
3. Cook 5 minutes more, then lower flame to low simmer, cover, and cook 10 minutes more. Serve with steamed rice, pasta, or crusty bread.
Yield: 4 servings.
By now most of us are, as the saying goes, “tomatoed-out.” In the dark days of winter we dream of fresh, succulent vine-ripened tomatoes. By late August, we’ve just about had our fill. I mean, how many tomato salads or stuffed tomatoes can you have? Well, kiddies, the season will last until October. And, yes, there are still many innovative ways to use this vegetable. Below are given some ingenious ways to use tomatoes. So, in the middle of a frosty February, you can again begin to dream of the fresh juicy crop come June .
RAW TOMATO SAUCE
That’s right, a raw sauce where the tomatoes don’t have to be cooked. Simple: In a bowl, combine 1 pound chopped tomatoes or 1 pint cherry tomatoes, halved; 1/2 cup diced mozzarella cheese; 1/3 cup chopped black olives; 1/4 cup olive oil; 1 teaspoon capers; 1 tablespoon red wine vinegar and 2 garlic cloves, minced. Stir in 1/4 cup fresh chopped basil, 1 teaspoon oregano, salt and pepper to taste. Let the bowl stand for 1/2 hour to allow the flavors to combine. Toss with you favorite hot pasta. 4 servings.
TOMATO WITH BASIL AND MOZZARELLA
The all time favorite, and the easiest thing to prepare: Wash and slice off the tops and bottoms of 1 pound tomatoes, and cut the tomatoes into about 3 slices each. Slice 1/2 pound mozzarella very thinly; wash and dry 10-12 large basil leaves (more if the leaves are small). On a salad plate, arrange the mozzarella and basil on the tomato slices, drizzle with olive oil, and sprinkle with some oregano and pepper. 4-3 servings.
TOMATO GRATIN
A fancy-fied tomato dish to impress your guests: Preheat oven to 500 degrees F. Cut 2 large beefsteak tomatoes into 1/2-inch slices. Arrange the slices, slightly overlapping, in an oiled 9-inch gratin dish or shallow casserole. Sprinkle with salt and pepper to taste, 2 tablespoons finely chopped basil, and 1 teaspoon oregano. Cook 2 garlic cloves, peeled and minced, in a small pan or skillet over moderate heat, stirring until fragrant, about 1 minute. Remove from heat and stir in 1 cup fresh bread crumbs, 1/3 cup grated Parmesan cheese, and salt and pepper to taste. Sprinkle over the tomatoes, and bake in the middle of oven until bread crumbs are golden, about 15 minutes. 4 servings.
TOMATO-FETA PITA SANDWICHES
In a large bowl, combine 1/4 cup olive oil and 1 tablespoon red wine vinegar. Add 1 teaspoon oregano, and salt and pepper to taste; 1 pint cherry tomatoes, halved; 1 medium cucumber, peeled, seeded and diced; 1 medium green bell pepper, chopped; 1/3 cup black olives, halved; 1 small red onion, chopped; and 1/2 cup fresh chopped parsley. Mix together, then stir in 1 cup crumbled feta cheese. Take 4 (8-inch) diameter pita bread, cut in halve and stuff with the tomato mixture. 4 servings.
HOMEMADE KETCHUP
That’s right, homemade ketchup. Believe me, much better than the stuff you get at the grocers, and much healthier. Store bought ketchup is all processed sugar and salt. Ca-ca. And the homemade brand is so easy to make: In a food processor, puree and blend 1/3 cup water; 3 small tomatoes, chopped; 2 tablespoons white vinegar; 1/4 teaspoon ground cloves; 1/4 teaspoon pepper; 1/3 cup honey; 1 tablespoon maple syrup, and 1 tablespoon cornstarch. That’s it. You’ll never use the store-bought stuff again.
Aioli is said to have originated in the Provence region of Southern France. It’s a traditional sauce composed of garlic, olive oil and egg. Yet there are many variations. Catalonia, in the northeastern part of the Iberian Peninsula, makes a version that uses olive oil and salt, pounded in a mortar until smooth, but minus the egg. The call it allioli. In Malta, they add crushed tomato to the mix. In other variations, mustard may be added, or even pears. Most people likened aioli to mayonnaise, because of its smooth, creamy texture. But it’s nothing like mayo, it’s distinctively garlicky.
Some of us may have experienced aioli as a spread on sandwiches or as a side for fries. It’s more versatile that that. You can drizzle it on salads, or as a dipping sauce for seafood, meat and vegetables. It’s good on cold roasts, and perfect as a tasty addition when a teaspoon or two is added to fish soups. You can toss some spaghetti or linguine with aioli sauce and top with Parmesan cheese for a rich pasta dish.
Aioli is a popular summer dish when fresh vegetables and juicy garlic are all over the place. That being said, as a creamy condiment it’s good any time of the year. And it is quite easy to make at home. You can bypass the traditional mortar and pestle by using a bender or food processor. Saves a lot of time and mess. The only caveat is the question of using a raw egg. If you are concerned about this, then an egg substitute can be used in place of the raw egg.
AIOLI
Note: all ingredients must be at room temperature
6 garlic cloves, peeled
1/4 teaspoon salt, or more to taste (preferably sea salt)
Juice of 1/2 lemon
1 cup extra virgin olive oil
Ground black pepper to taste
1. Place garlic and salt in a blender or food processor, and pulse for about 2-3 seconds.
2. Add lemon juice and egg. Pulse the mixture in intervals until it well combined. Do not blend the mixture more than necessary.
3. Turn on the food processor again, and slowly add the oil, a few drops at a time. After about 1/3 of the oil has been added, add remaining oil in a slow steady stream. If the mixture is too thick, you can add a little water and blend in into the mixture until desired consistency.
4. Season with pepper and serve.
Yield: approximately 1 1/2 cups.
Note: picture courtesy of Anne Cusack/LAT
Gazpacho is the perfect summer dish, especially when it’s just too hot to cook. This famed Spanish soup is of Moorish origins. Remember that the Moors (Muslims of Northern Africa ) occupied Spain for over seven centuries. Some etymologists suggest that the word, gazpacho, derives from the Arabic word for soaked bread. Others say that it may have come from the word caspa, which means residue or fragment—as in the residue or fragments of bread used in the original recipe.
Andalusia is renowned as the home of gazpacho, especially in the province of Malaga. It probably originated as a soup of soaked bread, olive oil, and garlic. Today the Spaniards would call this an ajo blanco, or garlic soup. And this was the most common gazpacho until the introduction of the tomato to the European continent, which resulted in the chilled tomato concoction of today.
Today, Andalusian gazpacho is made with ripe tomatoes, bell peppers, cucumbers, garlic, moistened bread, and ice water. But I’ve gone back to the original gazpacho as derived from its Moorish influence.
GAZPACHO CON AJO BLANCO
1 cup untrimmed fresh bread, cubed
3 cloves garlic, peeled and finely minced
1/2 teaspoon salt
1/2 cup olive oil
Cold water
4 tablespoons chopped scallions
1. Soak the bread in water. Drain and squeeze to extract excess moisture.
2. In a mortar (preferably earthenware), pound the garlic until crushed.
3. In a wooden bowl, mix the garlic, bread, and salt, and stir in the olive oil.
4. Add cold water as desired, to get the smoothness of a soup. Recall this the original gazpacho, which is served at room temperature, garnished with chopped scallions. But, if you want, you can serve it chill after an hour or so in the fridge.
Yield: 4 servings.
Note: You can modify this recipe for Malaga-Style Gazpacho by adding 2/3 cup crushed peeled almonds and 1/2 teaspoonr red wine vinegar before adding the cold water.
I spend my summers in Vermont, where every vegetable garden is overflowing with zucchini. It seems to grow in profusion almost everywhere. But even in my native New York it is a ubiquitous summer staple. But what to do with it? We see it in all kinds of salads, but how to liven it up? Over here they love zucchini. They eat it fresh, fried, steamed, and broiled. In my experimentation I’ve come across novel ways to prepare it. Following are two dishes that highlight zucchini as a summer salad. One is a simple creamy dill salad with lots of fresh dill; and the other entails fried zucchini slices. Either way, it’s a unique way to prepare this summer favorite.
CREAMY DILL ZUCCHINI SALAD
(Note that in this preparation you can have the zucchini, raw as is, for that crunchy texture. Or you can elect to steam the zucchini slices if you like a softer touch. Either way, it’s great.)
2 large zucchini
1 cup thinly sliced red onion
Salt to taste
1/2 cup dill pickles, quartered and sliced into 1/2-slices
1/2 cup chopped fresh dill
1/2 cup sour cream or yogurt
Ground black pepper to taste
1. Wash zucchini and dry with paper towels. Slice zucchini diagonally into thin rounds, and cut larger rounds in half.
2. In a bowl, combine zucchini, onion, salt, pickle slices and dill. Mix in sour cream or yogurt. Season with pepper.
Yield: 4 servings.
FRIED ZUCCHINI SALAD
(some might regard this as a variation on what is called a scapece salad, where a marinade is used for the zucchini. In this simpler version, the marinade is omitted.)
1/4 cup olive oil (preferably extra virgin)
1 teaspoon honey
Juice of 1 lemon
2 cloves garlic, peeled and finely minced
2 tablespoons toasted fennel seeds
Salt and ground black pepper to taste
Vegetable, canola, or olive oil for frying
3 to 4 medium zucchini, sliced into 1/4-inch rounds
1 bunch spinach (about 6 cups)
1/4 cup grated goat cheese such as manchego, or crumbled blue cheese
1. In a small bowl, which together the oil, honey, lemon juice, garlic and fennel seeds. Season with salt and pepper and set aside.
2. In a large skillet over medium heat (I prefer cast iron), heat about 1/4-inch oil until hot but not smoking. Place zucchini in a single layer, and fry, turning the slices once or twice with a fork. You may have to do this in batches since you do not want to crowd the skillet. Fry until the slices are golden (about 5 minutes). Transfer to a plate lined with kitchen towels and set aside.
4. In a large bowl, assemble the spinach. Place zucchini slices on top. Drizzle with the dressing and toss gently. Top with the grated goat cheese or blue cheese.
Yield: 6 servings.
I’m a partisan of Mexican cooking. It has been one of my favorite cuisines due to its variety and assortment of flavors. Of course, I’m talking mainly of that variation that most Americans eat north of the border. By that I mean Tex-Mex cooking, that hybrid that combines American products (such as processed cheese) with the culinary artistry of Mexican-Americans living in the U.S. It began in southern Texas and has spread throughout the continent. It’s hallmark is heavy use of cheeses, pork, beef, beans and spices such as cumin (which is of Indian origin). It’s basically Americanized Mexican food. Did you know that nachos, fajitas and chimichangas are all Tex-Mex inventions?
I’ve discovered that this type of cooking is also very applicable to the ole summer grill. In fact, grilling enhances the natural flavors. Below are given two tryout recipes, each easy to make and delicious. With a bottle of Corona or Dos XX, it makes a perfect summer barbeque.
GRILLED QUESADILLAS
8 flour tortillas (6-inch)
1 can (16-ounces) refried beans
1/2 cup shredded Cheddar cheese (I’ve also tried it with blue cheese for a more pronounced smoky flavor)
1/2 cup chili sauce or picante sause (if you really want it hot you can substitute Sambal, a hot sauce found in Asian markets)
3 scallions, sliced thinly in rings
1. Whether using coals or gas, preheat grill for 5 minutes.
2. Place tortillas on a plate and spread a portion of beans on half of the tortillas, but being careful to come to at least 1/2 inch from the edge. Top with cheese, chili sauce, and green onions. Moisten edges of tortillas with water (if desired, you can use a kitchen brush for this). Top with remaining tortillas and press the edges closely together. Then cut each tortilla into halves.
3. Place tortillas on grill. If it’s a small grill you may have to do it in 2 or 4 apiece. Close lid and grill 4 to 5 minutes. Remove from grill. You can have it as is, or cut each half into 3 triangles for what we call “finger food.”
Yield: 4 servings.
GRILLED TACOS
1 pound lean ground beef, ground chicken, or turkey
1/2 cup sliced scallions
1 package (1 1/4-ounce) taco seasoning mix
12 taco shells
As much as desired: shredded lettuce, tomatoes (regular tomato slices or halved cherry tomatoes), and shredded Cheddar cheese
Sour cream to taste
1. Wheather coal or gas, preheat grill for 5 minutes.
2. Place a piece of aluminum foil on grill. Crumble beef on foil and top with scallions. Sprinkle with the taco seasoning. Close lid and cook 6 minutes or until beef is brown and no longer pink.
3. Place a portion of cooked meat on each taco shell. Then top with lettice, tomatoes, and cheese.
4. Add a dollop of sour cream on top and serve.
Yield: 4 servings.
When one thinks of summer cocktails, what comes to mind are the usual standbys: gin and tonic, or a a tom collins or, in you’re down south, a mint julip. Or else you think of all those sticky-sweet frozen drinks with little umbrellas sticking out of them. When hot weather rears its head, our libations change accordingly. You want some thing cool and icy, and quick. If you’re like me, you don’t want to mess with blenders and such. You want something fast and refreshing, something more substantive than the usual white wine.This is where rum comes in. It’s the quintessential summer drunk. My forebears hail from the Caribbean where they have been battling hot summers with this elixir since time immemorial.
Now, in terms of rum, most people consider summery drinks as being daiquiris, mojitos or pina coladas. That’s great if you want to spend time fussing and blending. But summer rum drinks can be as invariably simple as a rum highball with soda or orange juice. Below are given some tropical rum drinks that are very easy to prepare. So, for that next BBQ or pool side party, or even while hanging out on the fire escape on a hot night, try some of these out.
Be aware that rum, like fine wine or brandy, has different characteristics. Some connoisseurs prefer a dark aged anejo, some prefer rum that is sweet and heady with molasses-like flavor, and some prefer a light, dry variety. In general, rum comes in two types: white (or silver) and dark (or gold). In terms of alcohol content, they usually come in 80 proof, and you can go up to 151 proof. The latter is not recommended for sipping. It is not a parlor drink. In my culture we use it to make coquito, a sort of high-powered egg nog that is definitely not a summer drink.
CUBA LIBRE: Mix in a shaker with ice and and pour (unstrained) into a 10 ounce highball glass: 2 ounces white rum and juice of 1/2 lime. Fill glass with club soda or seltzer water.
HAVANA COCKTAIL: Mix and shake well with ice: 2 ounces white rum, 1 ounce pineapple juice, and 1 teaspoon sugar. Strain into a cocktail glass. (Note: you can substitute, if desired, 1/4 ounce grenadine syrup in lieu of the sugar).
LIBERTY COCKTAIL: Mix and shake well with ice: 1 ounce dark rum, 2 ounces apple juice, and 1/4 ounce grenadine. Strain into a cocktail glass.
MADAGASCAR COCKTAIL: Mix and shake well with ice: 1 ounce white rum, 2 ounce orange juice, 1/2 teaspoon lemon juice. Top with grated or powdered nutmeg.
MINT CRUSH: Mull 8 fresh mint leaves (washed and wipe clean) and 1/2 teaspoon powdered sugar in an old-fashioned glass (8 oz.) Add 3 ice cubes and 2 ounces dark rum. Fill with water and stir. Decorate with a mint sprig.
MONKEY WRENCH: Pour 2 ounces white rum into a highball glass with ice. Fill with grapefruit juice and stir.
PINEAPPLE FIZZ: Shake well with ice and strain into a highball glass: 1 ounce white or dark rum, 2 tablespoons pineapple juice, and 1 teaspoon sugar. Fill with club soda or seltzer water.
RUM COBBLER: In a goblet or mug, dissolve 1 teaspoon powdered sugar in 2 ounces club soda. Fill with ice, add 2 ounces dark rum and stir. Serve with a straw.
RUM COLLINS: Pour 2 ounces white rum in a highball glass over ice. Add juice of 1/2 lemon and 1 teaspoon sugar. Stir well and add club soda, a maraschino cherry, and a slice or orange. This can also be done with dark rum. In which case you add the juice of a lime instead of lemon.
RUM FIZZ: Mix and shake well with ice: 1 1/2 ounce white rum, juice of 1/2 lemon and 1 teaspoon powdered sugar. Pour (unstrained) into a highball glass and fill with club soda or seltzer.
RUM HIGHBALL: Into a highball glass filled with ice, pour 1 ounce white or dark rum. Fill with ginger ale, and add a slice of lemon or lime and stir.
RUM RICKEY: Squeeze juice of 1/2 lime into a 10 ounce glass. Add ice cubes and 2 ounces white rum. Fill with club soda or seltzer.
RUM SANGAREE: Mix and shake well: 2 ounces dark rum and 1 teaspoon powdered sugar. Pour into an 8 ounce glass with 3 ice cubes. Fill with club soda or seltzer and sprinkle some ground nutmeg on top.
RUM SOUR: Shake well with ice and strain into a 6 ounce whisky sour glass: 2 ounces dark rum, juice of 1/2 lemon and 1/2 teaspoon powdered sugar. Add a maraschino cherry and decorate with 1/2 orange slice. Or you can serve the drink on the rocks in an old-fashioned glass.
RUM SWIZZLE: Into a highball glass pour 2 ounces dark rum, juice of 1/2 lemon, 1 teaspoon sugar and 3 sprigs fresh mint. Fill with ice, club soda, and then use a swizzle stick until it froths over.
TRINIDAD COCKTAIL: Shake well with ice and strain into a cocktail glass: 2 ounces dark rum, juice of 1/2 lime, 2 dashes angostura bitters, and 1 ounce grenadine syrup. Serve with a twist of lemon peel.
TROPICAL COCKTAIL: (Created at New York’s Essex House, I’m told) Shake well with ice and strain into a cocktail glass: 1 ounce dark rum, juice of 1 lime, 2/3 teaspoon grenadine, and 1 teaspoon sugar. Garnish with pineapple slices.
WEST INDIAN SWIZZLE: Into a cocktail glass add 2 ice cubes, then pour 2 ounces dark rum (preferably West Indian rum), 1 lump sugar, 1 dash Angostura bitters, and 2 ounces club soda or seltzer. Swizzle with stick to froth.
There they are. Go out, experiment, explore, and have fun.
1 jigger light rum
For every dinner, dessert is the crowning achievement. But ice cream, pie, and the usual fruit gets tiresome after a while. Here is a recipe that will wake everybody up. Its centerpiece is bananas. Yes, bananas. It’s the easiest thing to prepare, and it’s bound to impress your significant other or anybody else for that matter. Strikingly simple to make and scrumptious. Guys and gals, no fancy gimmicks here, Just sautee the bananas and serve with peach slices. Now, if you wan to exaggerate a bit, you can say how you slaved over the stove just to come up with this fancy-dan dessert. And who’s to know? At the end of the meal, your family and friends will sing your praises.
The recipe is from my first cookbook, Puerto Rican Cuisine in America (Avalon Books – Thunder’s Mouth Press). And it’s an example of how we dress up a basic fruit and make it glorious.
GUINEOS CON CREMA DE COCO
(Bananas with Coconut Cream)
2 tablespoons butter or margarine
2 ripe bananas, peeled and sliced in half lengthwise
1 tablespoon lime juice
1/2 cup cream of coconut
Fresh peach halves
1. Melt butter in a large pan or skillet
2. Add bananas and saute briefly until well coated
3. Sprinkle with lime juice.
4. Remove bananas to serving dish and spoon cream of coconut over them.
5. Garnish with peach halves and serve.
Yield: 4 or more servings.
© 2025 Oswald Rivera
Theme by Anders Noren — Up ↑