Oswald Rivera

Author, Warrior, and Teacher

Category: Cooking (page 1 of 2)

My Culinary Journey

Why do I write cookbooks? Easy enough — because I avidly enjoy good food and drink and I want to share that experience.
 
I consider myself a gourmand, not a gourmet, which means that I know my way around a kitchen but I am not professionally trained. Back in Spanish Harlem when I was growing up, I watched my mother as she prepared the evening dinner, and I discovered that mixing all those things together and spreading them around in a pan was fun. Sadly, in the 1950s and 1960s a male of any age in the kitchen was not culturally acceptable so I found myself fighting collective norms from an early age. Then came my bachelor years and the realization that I was not going to be able to survive on canned spaghetti and Coca Cola. Reality, however, took a decidedly positive turn when my beloved Uncle Phillip, himself a great cook, told me that cooking great meals was the best way to impress a date. “You want to impress some young lady? It’s as easy as pie…make her a great meal.” I ignored his pun and expanded my repertoire.
 
Read more

COOKING WITH BAY LEAVES

The humble bay leaf has been with us since time immemorial. But it amazes me of how many cooks that I know who relegate it to a second tier status and use it infrequently, if ever. Bay leaves are primarily considered a spice but, to my mind, the bay leaf should be up there at the top of the condiment pyramid along with salt and pepper. They’ve been in use since the time of ancient Greece and Rome. Its leaves constituted the wreaths of laurel that crowned victorious athletes in the ancient Olympics. But it’s not only cuisine; they’ve also been used in folk medicine to help relieve such ailments as diabetes, colds, high cholesterol, asthma, constipation, gas and bloating.

Of course, it goes without saying, one of their great values is enhancing recipes. For example, when making a meat sauce with ground meat, add four or six  bay leaves into the oil that cooks the onion and garlic at the beginning. Then add the meat and the rest of the ingredients, and continue cooking as you would a regular sauce. Or when grilling Shiskabab (kebabs), soak bay leaves in water, them skewer them on directly next to the chicken, lamb, beef, veggies. etc. Then grill as you would normally. Or you can wrap a whole, seasoned chicken or chicken parts in foil with a carpet of toasted bay leaves on top and on the bottom. Seal it and cook in a slow oven. Finally, you can boil bay leaves in water to make a tea that helps digestion.

As noted above, there are myriad bay leaf recipes. My favorite simply involves rice and beans, a dish common to Latino cooking. In this case, the bay leaves give an interesting twist to the dish, and make the rice and beans a glorious endeavor.

Note that, with the beans, you can use black beans, red beans, white beans, pinto beans or even back-eye peas. Also, I’ve taken a leaf from Mexican cooking and add Mexican crème or cream fraiche to the recipe. I find that Mexican crème is easier to prepare than cream fraiche, which is a more involved recipe. For Mexican crème: In a mixing bowl, combine 1 cup heavy cream, 1 tablespoon sour cream, 1 tablespoon freshly squeezed lime juice, and a dash of salt. Whisk for a minute or so. Cover loosely with plastic wrap and let rest on the counter for four hours during which time it will thicken. That’s it. When serving, you can top off the beans with the crème.

RICE  AND BEANWITH BAY LEAVES

To make the rice:

Ingredients:

2 cups long grain rice
Water to cover rice
3 tablespoons olive oil
Salt to taste
3 bay leave
Small piece of cinnamon stick
6 cardamom pods
1 chicken bouillon cube

Instructions:

1. Wash rice under cold running water and drain to get rid of starch. The way I do this (wash the rice) is to place rice in a pot with water to cover.        Let it sit for 3-4 minutes, then drain and rinse again in a colander until the water runs clear. Friends ask me, why do this? Simple, the  rice will            cook to perfection.
2. Heat olive oil in a heavy kettle or pot. Add rice and stir until grains are opaque.
3.  Add water to cover by ¼ to ½ inch. Add salt, bay leaves, cinnamon stick and cardamom pods.
4. Bring to a boil, add bouillon cube, cover and simmer on low heat until water is absorbed, usually 20-39 minutes. Remember that, when                         serving with the beans, remove and discard cinnamon stick and cardamom pods.

To make the beans:

Ingredients:

3 tablespoons olive oil
1 medium onion, peeled and chopped
2 cloves garlic, peeled and minced
3 bay leans
2 (15-oz.) cans of black beans
I cup fresh chopped tomatoes
½ cup fresh chopped cilantro

Instructions:

  1. While rice is cooking, heat olive oil in a large skillet or frypan over medium heat.
  2. Add onion and garlic and sauté for about 2 minutes.
  3. Add bay leaves and continue sautéing until onions are caramelized.
  4. Add beans, tomatoes and cilantro. Lower heat to simmer and continue cooking, stirring, for 5 minutes more. Serve over rice and topped with the Mexican crème.
    Yield: 4 servings for big eaters, 6 servings for light eaters.


Sofrito | Spanish Rice

Sofrito is ubiquitous in Caribbean cooking. One could safely say that Puerto Rican cuisine would be wanting without it. It is an aromatic mix of herbs and spices that is a base for cooking countless criollo dishes. This concept can be found in other cultures as well. One example is the Indian mix called garam masala which is also used as a base flavoring. Or kimchi, the fermented cabbage condiment, so popular in Korean cooking. The word sofrito is a generic term that has no correct English translation. “Frito” in Spanish means fried. Sofrito could be taken to mean stir-fried. Although this would not be entirely accurate. As the recipe shows, sofrito can be whipped up in a few moments’ time in a blender or food processor. And it can be stored in a closed tight jar the refrigerator for three to four days or, in the freezer compartment, indefinitely.
Continue reading

Pasteles (Part 1)

Pasteles are a singular creation made from common ingredients: root plants stuffed with meat. The meat is usually pork, but it can also be chicken or turkey. At home it’s prepared only on the most special occasions. When I returned home from Vietnam this was the first dish my mother made on honor of my arrival. If you’re traditional you have to use plantain leaves to wrap the thing. If they can’t be found, then wax paper will do. Plantain leaves are abundant in Caribbean and Asian markets. These days they come frozen wrapped in bundles of 12 or more. Believe me, there is a difference between pasteles made with plantain leaves and those wrapped in wax paper. 
Continue reading

Pasteles (Part 2)

Pasteles are a singular creation made from common ingredients: root plants stuffed with meat. The meat is usually pork, but it can also be chicken or turkey. At home it’s prepared only on the most special occasions. When I returned home from Vietnam this was the first dish my mother made on honor of my arrival. If you’re traditional you have to use plantain leaves to wrap the thing. If they can’t be found, then wax paper will do. Plantain leaves are abundant in Caribbean and Asian markets. These days they come frozen wrapped in bundles of 12 or more. Believe me, there is a difference between pasteles made with plantain leaves and those wrapped in wax paper.
Continue reading

Avocados for Summer

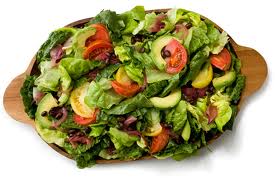
Yesterday In New York, the temperature reached 104 degrees F.—and that was the mean temperature, not the heat index (which was probably 112-114 degrees). Today, we’re told, ain’t going to be much better. With heat like that, the idea of cooking anything is out of the question. Even lighting up the old grill seems onerous. So what better way to fight heat and hunger than with AVOCADOS! Yes, that delicious fruit. That’s right, it’s a fruit, not a vegetable.

In my family we’ve consumed avocados forever. And not only as guacamole. We have it with eggs for breakfast; or in sandwiches for dinner. Mainly we eat it anywhere with a dash of salt and pepper. Avocados are perfect for summer since they need no cooking. Just peeled, remove the pit, slice, drizzle with a little olive oil and salt, and there you have it. But more, avocados and perfect for salads.

Avocados were introduced from Mexico to California in the 19th century, where they proliferated and became an extremely successful cash crop. In fact, Fallbrook, California, claims to be the “Avocado capital of the world.” The most common type of California avocado is the Hass variety, which is found everywhere these days. In my clan we like the Mexican /Guantemalan breeds life the Fuerte or Mexicola. These are bigger, have a smooth green skin and, to my palette, a richer nuttier flavor. But our prefer variety are those from Florida (like the type called Spinks)  which are larger, rounder, with a smoother flavor.

Avocados got their name from Spanish Explorers who couldn’t pronounce the Aztec word for it: “ahuacatl” or “testicle” (because of its pear shape appearance). The Spanish mispronounced it as “aguacate.”

Below are 3 quickie  avocado salad recipes, all from my cookbook Puerto Rican Cuisine in America (Avalon Books: Thunders Mouth Press). Now, the main question: how can you tell when an avocado is ripe? Simple. It’s outer skin will yield to gentle thumb or finger pressure. Eat ripe avocados right away. If they are green and hard, store in a cool place a day or two before using. If you want it to ripen faster, put the avocado in a brown paper bag.

1) GAZPACHO DE AGUACATE:  In a bowl, combine 1 large ripe tomato, diced; 1 medium cucumber, diced; 1/2 medium green bell pepper, seeded and diced; 1 small onion, finely sliced; 2 cloves garlic, minced; 1/4 cup chopped fresh parsley; 1 tablespoon chopped fresh basil or 1/2 teaspoon dried; 3 tablespoons olive oil; 2 tablespoons red wine vinegar; 1/4 teaspoon oregano;  salt and ground black pepper to taste. Mix well and let stand in the refrigerator for15 minutes. Take 3 fully ripened avocados,  cut in halve; and place an avocado half on a salad plate with a bed of crisp lettuce leaves. Fill each avocado half with the vegetable mixture and serve. 6 servings.

2) ENSALADA DE AGUACATE Y HONGO: In a mixing bowl, combine 3 tablespoons olive oil, 1 teaspoon red wine vinegar, 1 teaspoon Dijon mustard, 2 cloves minced garlic, salt and pepper to taste. Add  1/2 pound fresh mushrooms,  washed and thinly sliced. Mix well. Cut an avocado in half; and cut each half into 1-inch cubes. Add to mushrooms and blend gently. Serve immediately. 4 servings.

3) ENSALADA DE AGUACATE Y JUEYES: In a bowl, combine 1 pound fresh lump crabmeat, 1 cup mayonaise, juice of 1/2 lemon, 2 tablespoons finely chopped onion,1 minced clove garlic, 1/4 cup chopped fresh parsley, 1/4 teaspoon dried oregano, salt and pepper to taste. Mix lightly. Cut 2 ripe avocados into slender wedges and squeeze juice of  remaining 1/2 lemon over the avocado to prevent discoloration. Place crabmeat in the center of a serving platter. Arrange avocado wedges along with slices of 2 medium tomatoes, alternately, around the crabmeat. Sprinkle avocado and tomatoes with salt; garnish with a few parsley springs and serve.4 servings.

Enhanced by Zemanta

Easter Lamb

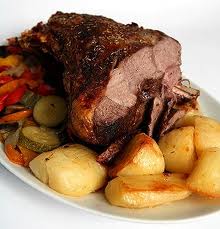
Last year, around Easter, I posted this lamb recipe. It’s our favorite in the Rivera family, and it got a good response. So I’m posting it again for this Easter celebration. As noted, then as now, this dish goes well with a good Australian Shiraz, Argentine Malbec, or California Pinot Noir.

Enjoy, kiddies.

PATA DE CORNERO AL HORNO (ROAST LEG OF LAMB)

Leg of lamb, about 5 pounds

3 cloves garlic, peeled and cut into slivers
10 whole black peppercorns
1 tablespoon dried oregano
1/2 teaspoon salt
1/2 teaspoon powdered thyme
1/4 teaspoon dried marjoram
2 tablespoons olive oil
4 large potatoes, peeled and quartered

1. Preheat oven to 325 degrees F.
2. Rinse lamb under cold running water and pat dry with paper towel.
3. With a sharp knife make several slits in the lamb. Stud the slits with garlic slivers.
4. Place peppercorns, oregano, salt, thyme and marjoram in a mortar and pound until crushed. Blend in olive oil.
5. Rub seasoning over entire leg of lam.
6. Arrange lamb in A shallow baking pan, fat side up, and bake for 1 hour, basting occasionally. Arrange potatoes around lamb, and continue baking 1 1/2 to 2 hours depending on desired doneness.
    Yield: 6 or more servings.

Enhanced by Zemanta

Stuffed Plantain Balls

I love plantains, especially green plantain, the type that we prepare in fritters called tostones. But you also have ripe plantains; essentially green plantains that have ripened to a deep, dark yellowish color. Some people prefer the ripe plantain since they give a sweeter flavor. In my family we prefer tostones. Although once in a while we cook ripe plantains with eggs for breakfast; or in a traditional dish called pinon (pronounced peen-yon) , a layered casserole of ripe plantains, beef and kidney beans.

Another of our favorite uses of ripe plantains is cheese-stuffed plantain balls. Think of it as fallafel balls but with cheese inside and a luscious, sweet exterior. Believe me, once you’ve had these plantain balls, you’ll be hooked. They can be served as an appetizer or as a main entree accompanied by rice—a perfect vegan dish.

CHEESE-STUFFED PLANTAIN BALLS

6 ripe plantains, unpeeled and cut in half widthwise
8 cups water
Salt to taste
1/4 cup butter
2 tablespoons cornstarch plus cornstarch for shaping balls
1/2 pound cheddar cheese, shredded
Oil for deep frying (vegetable oil, corn oil, canola oil, olive oil, etc.)

1. Drop the plantain halves into boiling salted water and cover. Cook rapidly for 20 minutes. Drain. Peel the plantains and mush the pulp. Add the butter and 2 tablespoons cornstarch and mix well. Let cool enough to handle.
2. To shape the balls, coat the palms of the hands with cornstarch. Pick up about 1 tablespoon of the pulp (or 1 teaspoon, depending on the size desired) and flatten slightly between the palms. Add a portion of the cheese and mold the plantain around it, shaping the whole into a ball. Repeat until all the balls are formed. Be aware that you can make the balls as large or as small as you desire. In the Rivera family we like big plantain balls. Other folk may prefer smaller variations similar to Swedish-type meatballs.
3. Heat the oil for deep frying. Drop the balls into the oil and cook until golden. Remove and drain on paper towels.
    Yield: 8 to 12 balls, depending on size.

Enhanced by Zemanta

Nouveau Grilling

Summer time an’ the livin’ is easy—which means that the grilling/barbecue season is here. But, you know what, kiddies—is it going to be the same old franks, burgers and half-burnt chicken? Now, not that there’s anything wrong with franks, burgers and half-burnt chicken. But why not try something different and out-of-the ordinary, like grilling fish? You heard it right: fish, like in seafood. Fish is perfect for barbecuing and grilling. It’s moist, delicious and easy to cook. Probably easier than grilling a steak.

Definitions are in order here. To my mind, grilling is just that: roasting meat outdoors over an open fire, grill, framework, or pit. Barbecue is when you add a highly seasoned sauce. So, wanna barbecue fish? Just add your favorite BBQ sauce. It’ll probably be better for you than some contaminated, e-coli meat.

Below are given two simple but scrumptious (I love the word) fish dishes. Both are made with what in the Old World is known as “al salmoriglio”—with an oil and lemon sauce. Better tasting and healthier for you, believe me. Both recipes can be cooked on a charcoal grill, brazier, or gas grill. In each case, preheat the brazier or grill. If you don’t have an backyard and a grill, you can also cook the fish in a broiler. In the first recipe given, you have to marinate the fish. This gives it a richer flavor. In the second recipe, marinating is not necessary, if you’re in a hurry. Both recipes will yield about 4 servings.

PESCE AL SALMORIGLIO (Fish steaks with oil and lemon sauce)

Recipe I:

In a covered bowl or container, combine 1/2 cup fresh lemon juice, 1/4 cup olive oil, 2 minced garlic cloves, 1/2 cup fresh chopped basil, 1 tablespoon dried oregano, salt and pepper to taste. Mix well. Add to the marinade 2 pounds fish steaks (swordfish, salmon, cod, halibut, or tile fish) cut crosswise into 1/2-inch thick pieces. Refrigerate for 3 hours or, better yet, overnight. Turn fish several times in the marinade. Preheat grill; and brush grill with a little olive oil. When grill is quite hot, place fish steaks on grill and cook quickly over high heat. The fish should be close to the surface heat, and it should take about 2 minutes to cook on one side. Turn over quickly but carefully and cook about 2 minutes or slightly longer on the other side. Do not overcook or fish steaks will become too dry. Remove fish from grill and serve with lemon wedges, if desired.

Recipe II:

In a small bowl, combine 1/2 cup fresh lemon juice, 1/4 cup olive oil, 2 minced garlic cloves, 1 tablespoon dried oregano, salt and pepper to taste. (Note: in this recipe, the basil is optional.) Mix well and set aside. Preheat grill; and brush grill with a little olive oil. Grill fish as noted above in recipe I. Transfer to a warm platter and pour oil and lemon sauce over the fish.

There you have, friends. Now you can truly impress your neighbors and loved ones the next time you use the old grill.

Enhanced by Zemanta

Wok Cooking – Part II (Steaming)


A wok is a perfect tool for steaming foods. The whole idea is to cook food rapidly using hot most air. This cloud of steam evenly cooks the food without need to boil it in water or broth. It’s perfect for cooking seafood since it preserves the delicacy of the fish. In the process one uses as much water as in necessary to steam the dish and, if the water boils away during the steaming, more water can be added to the wok.

Any food can be cooked by steaming, be it meat, sliced or in big chunks, or vegetables, either frozen or fresh. If the food is frozen, it should be brought to room temperature otherwise condensation will result and the food will become too moist and watery. Slow steaming takes about 40 minutes to an hour. Quick steaming of cut or sliced food can take 5 to 15 minutes.

Most woks come with a steamer attachment: a small round, serrated metal stand on which you can place the food. If you don’t have one, then you can make a homemade version by piercing holes in a metal pie plate. The wok is filled with 2-3 cups of water. A small can is placed into the water and the pierced pie plate rests on the can. The food is laid on the pie plate and the wok is covered with the lid after the steam starts rising. You start steaming the food when the water reaches a fast boil. When steaming delicate foods such as fish, timing is very important. Too long a time steaming will toughen the food. It’s best to remove steamed foods a minute before they are completely cooked. That way the heat of the steamer will complete the cooking process and the food will come to table hot and perfect.

The recipe given is for steamed chicken. The chicken can be steamed as is, in water, and a sauce poured over it before serving. My recipe calls for the chicken in a marinade (makes it more flavorful that way).

BASIC STEAMED CHICKEN

12 ounce chicken (with bone and skin), cut into approximately 1-inch pieces

Marinade:

2 tablespoons light or dark soy sauce
1 teaspoon brown sugar
1 tablespoon cornstarch
1 teaspoon sesame oil

1. Rinse chicken pieces under cold running water and pat dry with paper towels.
2. In a bowl, mix marinade ingredients. Add chicken pieces and let marinate for 15 minutes at room temperature.
3. Arrange the pieces on a plate in a single layer and steam at medium-high for 10 minutes. Serve with boiled rice.
Yield: 4 servings.

Note: A bigger (2 1/2 to 3 pound) chicken can be use. In this case, increase soy sauce to 3/4 cup, and marinate with other ingredients as given. Place chicken pieces on a plate and arrange in a heaping shape with skin side on top. Steam for 10 minutes, remove lid from wok and, using tongs or a fork, rearrange chicken pieces so that skin pieces are on bottom and other pieces on top, and steam for another 10 minutes.

Reblog this post [with Zemanta]

Food and Revolution


“A shortage of bread has been suggested as the cause of the fall of
Rome, the French Revolution, and the Russian Revolution of 1917.”
The Story of Bread by Ronald Sheppard and Edward Newton

While doing research on my latest book, which covers the topics of food and war, I was really taken by how food, or the lack of it, can cause social distress. By that I mean, chaos and revolution. We fat Americans are really lucky. We’ve never had to face a nationwide shortage of food. Even during the Depression there were mechanisms to keep most of us fed. Charities and other social structures provided if, nothing else, soup kitchens and other food outlets. Sometimes I wonder what would happen if the discrepancy between the very rich and the very poor became such that millions of us died of starvation. I tell you what happen: mass revolt.

There is no more vivid example of this than the French Revolution. Many myriad causes are attributed to that upheaval but most prominent was the class differences in that society. Especially in terms of food consumption. It was the contradiction of great excess and terrible poverty. The monarchs and aristocrats feasted royally while the starving peasants, well, starved. When a catastrophic famine hit in the late 18th century, the price of bread rose up nearly 90 percent. The peasants depended on bread to sustain themselves, but there was none to be had; and food shortages in 1788-89 finally ignited the revolution.

The profligate lifestyle of the royals became glaring. While people died of hunger on Parisian streets, the excesses and arrogance of the royals, aristocrats and the clergy (yes, the Church was part of the problem) continued unabated.

In good times peasant food consisted mainly of bread and gruel (a pottage made of ground beans or soup with vegetables and perhaps a little meat thrown in). When famine hit, even this was no longer available. In contrast, the royalty had it better, much better. Below is a menu for a supper given for Marie Antoinette, the consort of King Louis XVI. Yeah, you could say she ate well. The menu comes from the imperial archives as quoted by L’Almanach des Gourmands pour 1862, by Charles Monselet. Here is her majesty’s dinner:

Four soups: Rice soup, Scheiber soup, Croutons with lettuce, Croutons unis pour Madame

Two main Entrees: Rump of beef with cabbage, Loin of veal on the spit

Sixteen entrees: Spanish pates, Grilled mutton cutlets, Rabbit on the skewer, Fowl wings a la marechale, Turkey giblets in consomme, Larded breasts of mutton with chicory, Fried turkey a la ravigote, Sweetbreads en papillot, Calves’ head sauce pointue, Chickens a la tartare, Spitted suckling pig, Caux fowl with consomme, Rouen duckling with orange, Fowl fillets en casserole with rice, Cold chicken, Chicken blanquette with cucumber

Four Hors D’Oeuvre: Fillet of rabbit, Breast of veal on the spit, Shin of veal in consomme, Cold turkey

Six dishes of Roasts: Chickens, Capon fried with eggs and breadcrumbs, Leveret, Young turkey, Partridges, Rabbit

Sixteen small entremets (menu stops here)

And all this for one person. Supposedly, when a group of starving women marched on the palace at Versailles, demanding bread, Marie Antoinette’s response was that if they didn’t have bread, “Let them eat cake.” Whether she ever said such a thing is open to question. It did seal her fate , and that of the king. At the height of the revolution, in 1793 they were both sent to the guillotine and had their heads chopped off.

Moral of the story: Beware. Piss off the people, take away their food and their sustenance, and you reap the whirlwind.

Reblog this post [with Zemanta]
Older posts

© 2025 Oswald Rivera

Theme by Anders NorenUp ↑