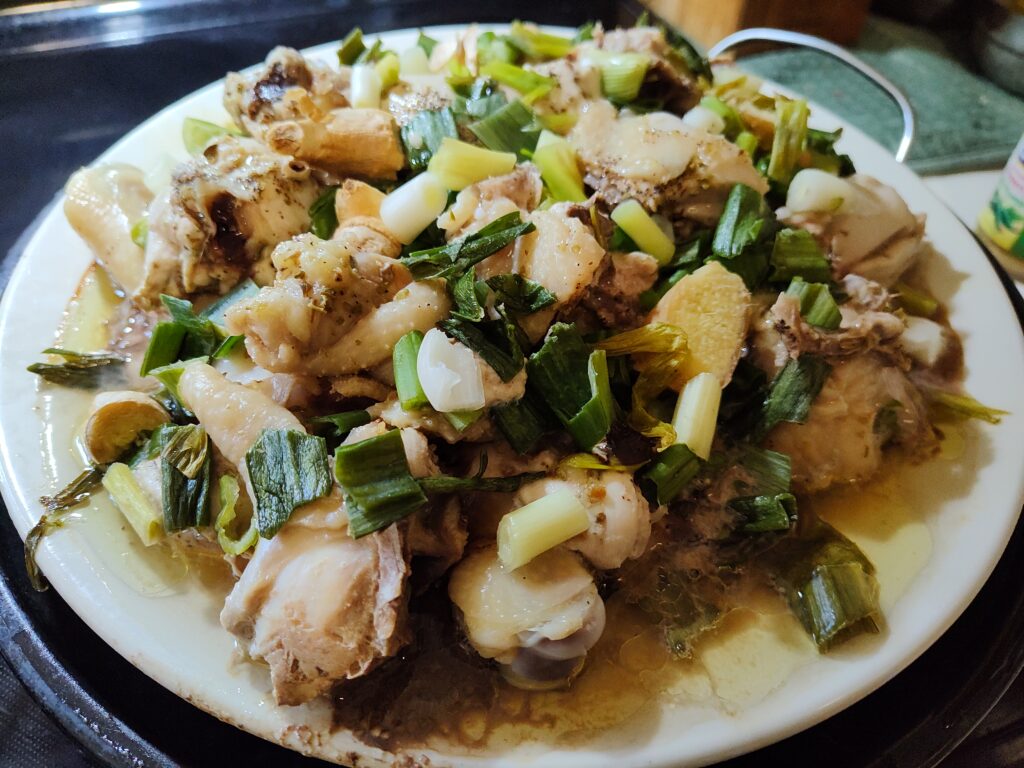
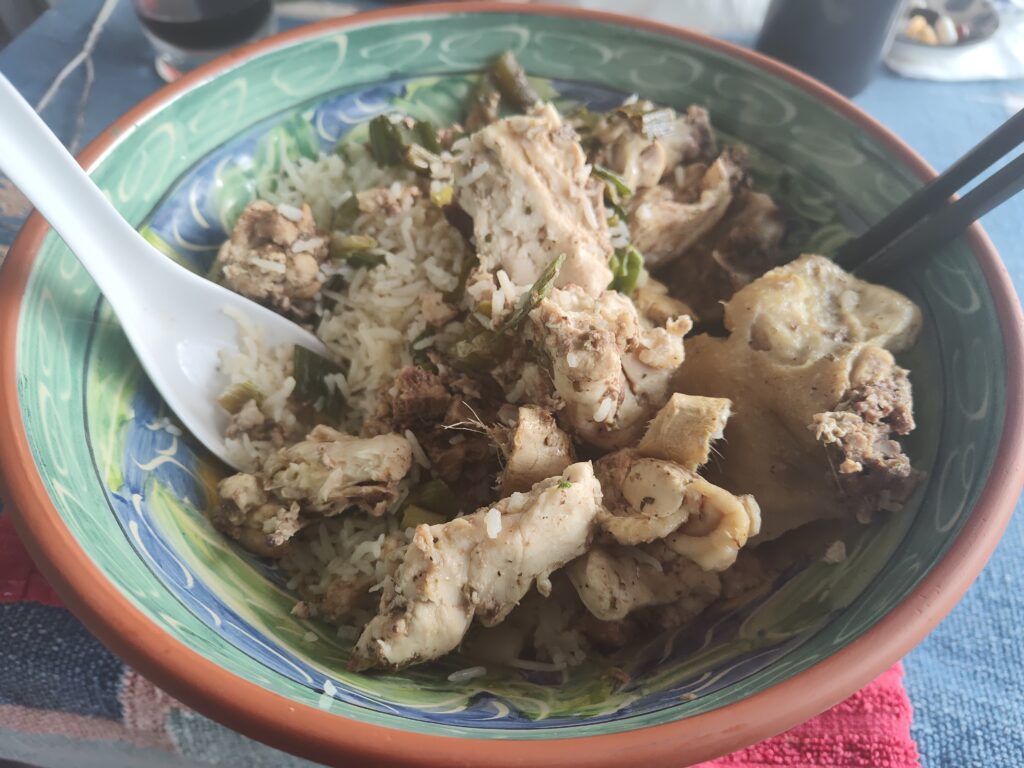
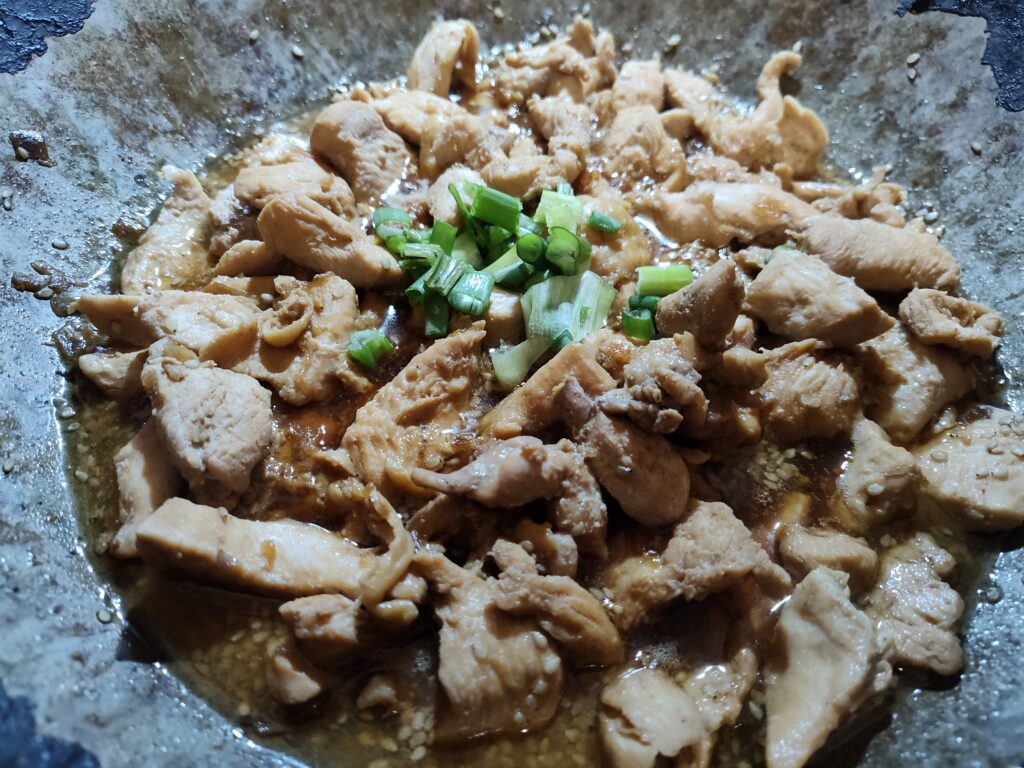
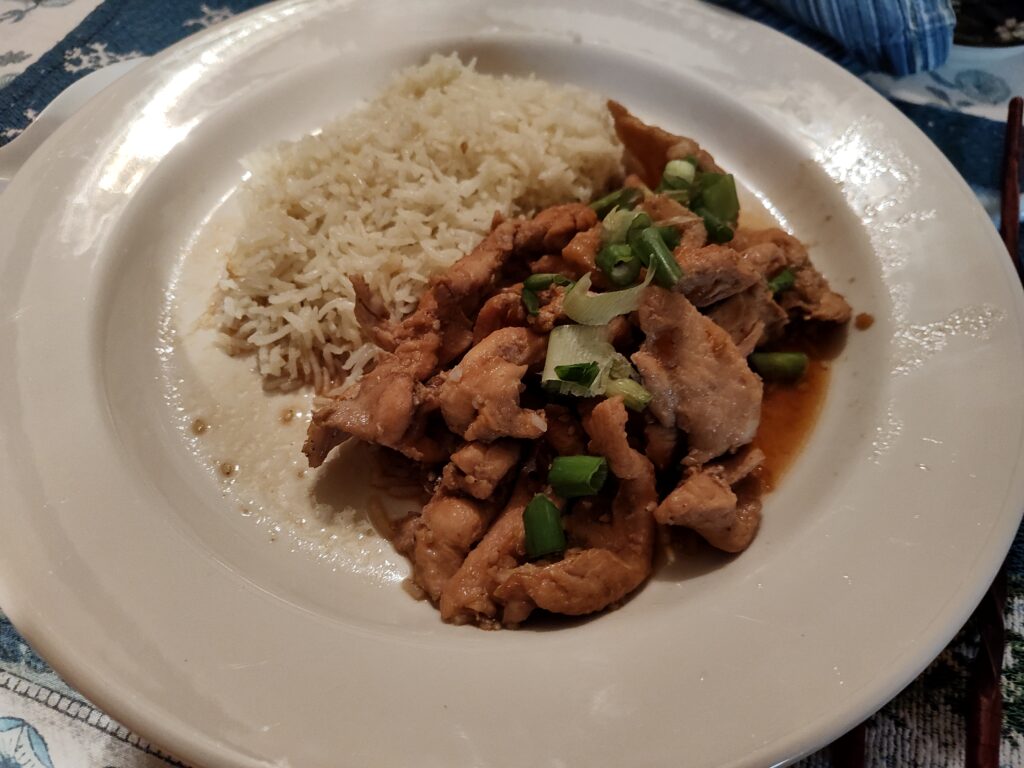
Oswald Rivera

Author, Warrior, and Teacher

Category: fowl (page 1 of 2)

PATAS DE POLLO EN SALSA DE HONGO (Chicken Legs in a Mushroom Sauce)

In our family, back in Spanish Harlem, we loved chicken cooked with mushrooms. Usually, it   was a whole cut up chicken, seasoned and fried until browned, then cooked in a sauce. One variation was using chicken legs or thighs when available at the local bodega or supermarket.  And that’s what we’re preparing today: Patas de Pollo en Salsa de Hongo, or Chicken Legs in a Mushroom Sauce. Let me add that this recipe can work with drumsticks or breasts, or other chicken parts.

In terms of mushrooms, we used white mushroom combined with portobello. But you can use whatever variety you prefer, be it shitake, cremini, chanterelle or other. Just let your imagination run wild.

This is an easy enough recipe that we normally served with rice. This time we paired it with spaghetti, another variation popular in our family circle. If desired, you can try it out with a favorite grain like couscous or quinoa or even kasha. Whatever suits the palate.

PATAS DE POLLO EN SALSA DE HONGOS
(Chicken Legs in a Mushroom Sauce)

Ingredients:

4 chicken legs, about 3 pounds
Salt and ground black pepper to taste
1 tablespoon dried oregano
4 tablespoons olive oil
1 medium onion, peeled and slice thinly
2 cloves garlic, peeled and minced
1 red pepper (pimento), washed and sliced thinly
1-pound mushrooms of your choice, washed and sliced thinly
½ cup chicken broth
1 teaspoon cornstarch
2 cloves garlic, peeled and minced
1 tablespoon heavy cream

instructions:

  1. Rinse chicken legs under cold running pat dry with paper towels.
  2. Rub chicken with salt, pepper and oregano
  3. Heat olive oil in large skillet or frypan over medium heat.
  4. Add chicken legs and cook skin side down until well browned, about 6 minutes. Turn chicken and cook on opposite sides until browned, about 5 minutes longer.
  5. Add onion and garlic and cook until onion is soft and translucent.
  6. Add red pepper and cook for about 2 minutes. Add mushrooms and stir-fry until they’re tender and browned.
  7. Mix chicken broth and cornstarch and add to skillet. Cook, stirring, until thickened. Not that, during this time, the mushroom will also release their moisture. That’s why we’re using only ½ cup liquid. If the sauce has not thickened enough, you can add more cornstarch mixed with water, if desired.
  8. Add cream, lower heat and cook until chicken legs are tender and soft, about 10-15 minutes more.
    Yield: 4 servings.

PECHUGA DE OLLO CON CREMA (Chicken Breasts with Cream)


We call this recipe, Pechuga de Pollo con Crema, or Chicken Breasts with Cream (or Chicken Breasts in  Cream Sauce). As you  can imagine, the cream is what gives this dish its pizzazz, or glamor. It’s a simple enough recipe: floured chicken breasts cooked in lots of heavy cream. In our Nuyorican version,  we do not pound the chicken breasts until they are relatively thin. That is something that our Italian brethren do. We like the suckers ample and meaty. As with most Boricua dishes, we usually serve this over rice. But you can substitute pasta, couscous, farro or favorite grain. In fact, it can also be a stand-alone dish with a hefty loaf of bread or bread buns. Your choice. Either way, everyone present at the table will love it (except for vegetarians or vegans, of course).

PECHUGA DE POLLO CON CTREMA
(Chicken Breasts with Cream)

Ingredients:

4 boneless chicken breasts
½ cup flour
Salt and ground black pepper to taste
¾ teaspoon oregano
¼ tablespoons olive oil
2 tablespoons flour
½ cup chicken broth
1 cup heavy cream
2 tablespoons dry sherry

Instructions:

  1. Slice or split each chicken breasts into 4 fillets.
  2. In a large plate or platter, season the flour with salt, pepper and oregano. Dip or dredge each chicken piece into seasoned flour.
  3. Heat oil in a large frypan or skillet. Add chicken fillets and fry on medium heat until tender and brow. Depending on size of skillet you may have to do this in batches. Remover to a hot serving dish and set aside.
  4.  Remove all fat from the skillet except for  2 tablespoons. Add chicken broth and cream, stirring until thickened.
  5.  Add dry sherry and cook  2 minutes longer.
  6.  Add chicken and mix with sauce until heated through. Serve immediately with favorite grain or pasta, either tubular or stringed.
    Yield: 4 servings.

ROAST DUCK

This is one of those special recipes that takes patience. You simply prepare the duck the day before by rinsing, wiping, and then storing in the refrigerator overnight. The rest is fairly straightforward, and you have a marvelous roast duck dinner. In this case, we served it with broccoli and potatoes. Also, the vegetables have to be steamed. This is a simple enough process: Place 2-inches of water in a saucepan. Insert a steamer basket and bring water to a boil. First place the potatoes in the steamer basket, cover, lower temperature and steam  5 minutes. Then add broccoli and steam 5 minutes more. The steaming time is just a suggestion. You may want them more or less tender depending on your preference. Your choice.

Note that this meal is meant to impress family and friends. The effort is well worth it.

ROAST DUCK

Ingredients:

1 5½ pound duck
2 cloves garlic, peeled and slivered
½ teaspoon oregano
Salt and ground black pepper to taste
1 tablespoon soy sauce
1 cup chicken broth
5 medium potatoes, washed, scrubbed and slice in half
1 pound broccoli florets
½ cup hot chicken broth
1 teaspoon sage
1 teaspoon thyme

Instructions:

  1. A day before cooking, rinse and wipe duck with a paper towel, and stuff cavity with a paper towel. Place duck in the refrigerator without covering it.
  2. The day you roast the duck, pre-heat oven to 325 degree F. Remove duck from the fridge and prick it all over with a fork. With a knife point, make holes in the breast and thighs and insert slivers of garlic. Place duck in a roasting pan. Sprinkle with oregano, salt and pepper. Rub the breast with the soy sauce. Place cup of water in the pan and roast the duck 1½ hours. Baste it from time to time with the cup of chicken broth. When the duck is cooked, remove to a serving platter.
  3. Steam the broccoli and potatoes.
  4.  While steaming the vegetables, degrease the roasting pan juices and pour into a small saucepan, Add ½ cup hot chicken broth, sage, thyme, salt and pepper.
  5. Serve the duck surrounded and garnished by the potatoes and broccoli with the sauce on the side.
    Yield: 4-6 servings.

GRILLED DUCK BREAST

This recipe takes grilling to new heights. It’s way beyond the purview of just plain franks, burgers, and chicken. This would be the epitome of grilling. No less than duck breast. Yes, it’s a mite on the expensive side. Again, these ain’t beef burgers. But the taste will be rich and magical. Served with grilled potatoes and zucchini, as we did it,  will render that special meal, even if it is on the grill. If desired, you can have it with a salad, or whatever side dish you want. So, be adventurous today. Take grilling one step further into nirvana (and I don’t mean the rock band).

The only suggestion I have when grilling duck breasts, is to sliced them lengthwise. A duck breast, say 1½ pound, is a thick slab of meat. Slicing it into a thinner piece will facilitate better grilling and quicker preparation.

GRILLED DUCK BREAST

Ingredients:

2 duck breasts
½ cup water
2 tablespoons maple syrup
1 tablespoons kosher or Himalayan salt
1 bay leaf
4 whole black peppercorns
Couple of slices of white ore red onion

Instructions:

  1. Rinse duck breasts under cold running water and pat dry with paper towels. Slice duck breasts in half lengthwise and set aside.
  2.  Mix all remaining ingredients in a small saucepan. This is the brine for the duck breasts. Bring the brine to a light simmer. Turn heat off, and mix to allow salt to dissolve. When it cools, add duck breasts, cover and let sit in  the fridge for up to 24 hours. The longer the breasts sit in the brine, the better the flavor.
  3.  Remove breasts and rinse well with fresh water. Dry thoroughly. Cook on medium-heat grill until medium rare or to degree of doneness desired. Remove from grill and let sit for at least 10 minutes before serving.
    Yield: 4 servings.


Steamed Duck

Until recently I would get my steamed duck from Chinatown. Then, almost overnight, it couldn’t be found anywhere. The stores where I had gotten the steamed duck, hole-in-the-wall joints that had been making it for years, were no longer offering it. This was disconcerting to me. Unlike everyone else I know, Asiatic or not, I prefer steamed to roast duck. Chinese roast duck is ubiquitous. We all know it and it’s featured at almost every Chinese dinner. This being the week of the Chinese lunar New Year, the Year of the Monkey, every banquet will serve it. But, to my mind, where roast duck is the preferred dish, steamed duck is for the connoisseur. Roast duck I can pass by. Steamed duck I cannot. So, here I was now, bereft. I couldn’t find my beloved fowl. I asked more than one proprietor, why no steamed duck anymore? They told truthfully, it didn’t sell as well as its other cousin. This further baffled me. Didn’t sell? In anger I thought, What do you want from the Great Unwashed. What the hell do they know?

Still, it didn’t solve my problem. Which meant that now I would have to make my own duck or go unrewarded. I canvassed my friends and acquaintances in Chinatown and finally came up with the following recipe. My one criteria: it had to be easy. I wasn’t going to mess with fandangled steamers and fryers and what-have-you. Some would question whether the recipe given could be categorized as steamed duck, some would say it’s mote like braised duck—and I don’t use a steamer. It’s all semantics. My friends call it steamed duck, and so do I. The dish is delicious. That’s all that matters. With some hot rice on the side, and a light red or chilled white wine, it can’t be beat.

One final note. Most places in Chinatown use Long Island duck, which is notoriously fatty. I’ve discovered there is other duck out there where the fat content is minimal. If you can, try to obtain a wild duck, or Muscovy duck, or Bavarian duck—which need no trimming of fat. If you do use the Long Island species, then remove fat from the cavity of the duck, and trim excess fat from the neck and body. And follow the recipe as is.

STEAMED DUCK

1 duck (4-5 pounds)
1 tablespoon salt
3-4 strips orange peel, about 2-inches long
1 tablespoon Chinese 5-Spice Powder
2 cloves garlic, peeled and crushed
1 whole star anise, smashed with the side of a cleaver
2 tablespoons ground coriander
1/2 teaspoon fennel seed
3 whole cinnamon sticks
1/2 cup dark soy sauce

Vinegar Sauce:
2 tablespoons white vinegar
1 clove garlic, chopped
1/2 teaspoon sugar
1 red chopped, chili pepper

1. Rinse duck under cool running water, and pat dry with paper towels. With the tines of a fork or sharp knife, prick the duck all over.
2. Place duck in a large wok or pot. Add water to cover. Bring to a boil and blanch duck in the boiling water for about 1 minute. This is done in order to rid the bird of its gamy taste. Remove duck from pot, drain well, and rub evenly with the salt, including the cavity.
3. Stir in the rest of the ingredients (minus vinegar sauce) to the water in the pot or wok. Bring to a second boil. Reduce heat to medium-low, and gently lower the duck into pot.
4. Reduce heat to low, cover and cook for 1 hour or until duck is tender (internal temperature using a meat thermometer should register 165 degrees F.)
5. Turn off heat and leave duck immersed in sauce liquid for another hour.
6. Remove duck from pot. Using sauce liquid, rub or brush duck all over. Cut into serving pieces. At this point, make vinegar sauce: combine ingredients in a small pan and heat briefly (about 3-4 seconds).
7. Heat a large nonstick pan over medium-high heat. Add duck pieces, skin side down, and saute until skin begins to sizzle and brown. Turn and brown on  other side.
8. Transfer duck to a serving platter and serve with vinegar sauce.
    Yield: 4 servings.

Roast Cornish Hens

For a holiday dinner, instead of the usual turkey, how about a Cornish hen roast? The warming spices in this treat will be a pleasant compliment to Christmas cheer. Here you have such staples as cumin and coriander to add an exotic twist to a classic dish. The hens are cooked in a glaze of honey, orange and ginger; then served over couscous. You family, friends and acquaintances will marvel at your ingenuity.

ROAST CORNISH HENS

1 teaspoon ground cumin
1 teaspoon ground coriander
1 cup fresh orange juice
1/4-inch piece of ginger, peeled and chopped
Zest of 1 orange, finely grated
2 cloves garlic, peeled and smashed
1 basil leaf, plus 1 tablespoon chopped
2 tablespoons honey
4 Cornish hens
3 tablespoons olive oil
Salt and freshly ground black pepper to taste
1 tablespoon fresh chopped oregano or 1 teaspoon dried
2-3 cups cooked couscous
2 tablespoons melted butter

1. Preheat oven to 425 degrees.
2. First, make the glaze: combine cumin, coriander, orange juice, ginger, orange zest, garlic, and basil leaf in a small pot or pan. Simmer over medium-high heat until reduced by half, about 5-7 minutes.
3. Discard garlic and stir in honey. Reduce heat and simmer gently about 2 minutes more.
4. Meanwhile, rub hens all over with oil, salt, pepper, oregano, and chopped basil. Place hens, breast side up, in a roasting pan (I prefer cast-iron) and place in oven.
5. Roast hens until skins begin to crisp, about 8 minutes. Remove from oven and generously brush with warm glaze. Return to oven and continue to roast until meat is just cooked through, about 25 minutes. Remove from oven and generously brush with glaze again, Return to oven and roast until glaze browns, about 3 minutes.
4. While hens are roasting, cooked couscous (according to package directions). When done, place in a bowl and toss with melted butter. Serve with each hen atop a mound of hot couscous.
    Yield: 4 servings.

Caribbean Quail

Quail, is a very distinctive bird, which comes in various sizes. In the store you’ll usually find the smaller coturnix quail. There are bigger quail out there such as the bobwhite and mountain quail; and if you do find them, cooking time will vary. Quail is very common in French cookery where it is noted in such classic dishes as grilled quail ragu. It is also found in Indian, Polish, Portuguese and even in Mexican cooking, such as quail mole (pronounced “moh-ley”) , which includes the famed mole poblano sauce with such ingredients as chili peppers and chocolate. Which set me to thinking, why not add a Puerto Rican twist twist to this delicious fowl? By that I mean using ingredients native to our cooking so that the result is a Caribbean treat. Thus you have the recipe given below.

Since this is a Boricua recipe, I served it with yellow rice. But you can substitute plain steamed white rice, or even serve it with tostones (fried green plantains—check the posting of 9/9/10 for a quicky recipe).

CARIBBEAN QUAIL

4 whole plucked quails, cut in half
1/2 cup olive oil
1/4 cup red wine vinegar
4 tablespoons fresh chopped oregano or 2 tablespoons dried
1 teaspoon salt
3/4 teaspoon ground black pepper
1 teaspoon garlic powder
1 teaspoon ground allspice
Juice of 1 lemon

1. Wash quails under cold running water and pat dry with paper towels.
2. In a small bowl stir together the oregano, salt, pepper, garlic powder, and allspice.
3. Rub the mixture all over the quails.
4. Place in a covered dish or in a zip-lock bag and refrigerate for at least 1 hour for the flavors to develop.
5. Preheat oven to 500 degrees F.
6. Place in a cast-iron frying pan making sure the quails do not touch each other (to speed the cooking process).
7. Roast from 10 to 15 minutes. The quicker time will render a tasty, juicy quail, but a little bit pink on the inside. I prefer the longer time span which will give a still succulent quail, but more browned and fully cooked. Note that beyond 15 minutes you, might get a dryer bird.
8. Remove from oven. Let rest for 5 minutes, drizzle with the lemon juice and serve over pilaf or yellow rice.
   Yield: 4 servings.

Boricua Squab

In general, most of us out there seldom if ever cook squab. It’s one of those (as my father would say) “rare bird dishes.” In a way it might go back to our culinary habits. Throughout history squab was considered a dish of the more wealthy and upper classes. Well, I don’t come from the wealthy or upper classes, and I love the suckers. Squab has a moist, tender and richer taste than most game birds. Its dark meat and fatty skin gives a milder flavor than other game poultry. And it can be found these days in most Asian, Middle Eastern or specialty food stores. I get my squab in New York’s Chinatown.

Squab has a long culinary history. It was popular in Ancient Egypt, Ancient Rome and Medieval Europe where domesticated pigeons were consumed. That’s what squab is: a young domesticated pigeon, usually about a month old. Recipes for squab go back back a long ways. In the 4th century Roman cookbook, Apicius, there is a recipe for roasted squab in a sweet and sour sauce. The well-to-do Romans did know how to live.

In cooking squab it should be remembered that due to their delicacy and size, it normally takes half the time to cook than it does chicken or other poultry. To maximize its taste it should be served medium-rare. I cook squab in what I call Boricua Style, that is,  the Puerto Rican way. I season it as my mother would season any game bird for roasting, using the herbs and condiments popular to our cuisine. It calls for crushing the condiments in a mortar. This device, either wood or metal, and native to our cooking, can be found in any Asian or Caribbean store. Even with the use of a mortar, the recipe is easy and no-fuss. With a good bottle of red wine, it can’t be beat.

BORICUA SQUAB

4 squabs, 1 to 1 1/4 pounds each

4 cloves garlic, peeled
12 whole peppercorns
Salt to taste
1 tablespoon dried oregano
2 tablespoons red wine vinegar
1/2 cup olive oil
1. Preheat oven to 450 degrees F.
2. Rinse squabs, inside and out, under cold running water. Pat dry with paper towels.
3. Place the garlic, peppercorns, salt and oregano into a mortar and pound until crushed. Rub the squabs, inside and out with the seasoning.
4. Place the birds in a shallow roasting pan (I prefer cast-iron). Drizzle with the vinegar, and pour in the olive oil to coat the squabs. Place in oven and bake 15-20 minutes (an instant-read thermometer inserted in the breast should read 145 degrees F.) Remove from oven and let rest 5 minutes before serving.
    Yield: 4 servings.

Tarragon Roast Chicken

Tarragon is one of my favorite herbs. It is aromatic and flavorsome, with an aroma reminiscent of anise (as in anisette). Thus a little bit goes a long way. The dish that follows is quite popular in our crowd, mainly for it taste and ease of cooking. It’s simply roast chicken with tarragon as the main component. In fact, if you’re tired of the traditional turkey for this coming thanksgiving, cook one or two of these birds and serve it instead. Sometimes it pays to experiment.

TARRAGON ROAST CHICKEN

1 3 to 3 1/4 pound whole fryer-roaster chicken
2 tablespoons red wine vinegar
2 tablespoons olive oil
1 tablespoon lemon juice
Sat and ground black pepper to taste
1 tablespoon fresh chopped tarragon or 2 teaspoons dried
2 cloves garlic, peeled and crushed

1. Preheat oven to 375 degrees F.
2. Rinse chicken, inside and out, under cold running water and pat dry with paper towels.
3. In a small bowl, mix together the vinegar, olive oil, lemon juice, salt and pepper. Bush whole chicken with this mixture.
4. Sprinkle with the tarragon, inside and out. Put crushed garlic inside chicken, and place chicken in  a roasting pan, breast side down. Bake for about 1 1/4 hours until chicken is brown and a fork can be inserted with ease.
    Yield: 4 servings.

Lebanese Duck

I’ve been a fan of Middle Eastern cuisine for a long while. I grew up with typical Caribbean fare; but once my horizons expanded, food from the Middle East, inclusive of Israeli cooking, became among my favorites. This includes dishes from Lebanon. And one of the modern favorites from this land is duck cooked with orange juice. Now, you’re probably thinking of the French duck a l’orange. Some say that  this Lebanese dish owes its inspiration to its French counterpart. Or, perhaps the opposite is true. Maybe the French version owes its genesis to the Lebanese version. I honestly don’t know. But I do know that this Lebanese treat is easier to prepare than canard a l’orange, and it is just as tasty.Served with Lebanese style rice, it makes for a great Middle Eastern dinner. Think of it this way, this is your time to impress family and loved ones with a unique repast—the Oooh’s and the Aaah’s will be worth it.

     LEBANESE DUCK
(Duck with Orange Juice)

1 duck (about 5-6 pounds)
1 large onion, peeled and cut into thin rings
3-4 tablespoons butter
2 cups orange juice
Salt and black pepper to taste
2 tablespoons finely fresh chopped parsley

1. Wash the duck under cold running water and pat dry with paper towels.
2. Heat butter over medium heat in a pan large enough to hold the duck, and fry the onion until soft and translucent.
3. Brown the duck in the same fat used to cook the onions, turning it occasionally to brown it all over.
4. Add the orange juice along with the salt and pepper. Cover, lower heat and simmer for about 1 hour. If the liquid starts to dissipate, you may add a ladleful of water from time to time, and turning the duck occasionally.
5. Remove the duck from the pan and let it cool. Cut into serving pieces and return to the pan. Continue to simmer the duck until it is very tender and had fully absorbed the flavor of the orange juice. Serve sprinkled with the parsley.

LEBANESE STYLE RICE

What I discovered is that rice cooked the Lebanese way is very similar to the way we cook rice in our house. Only difference is that we add olive oil instead of butter while the rice is cooking.

2 cups long grain rice
4 cups water (if you prefer a drier type of rice with individual grains then make it 1 1/4 cup water for 
   each cup of rice).
Salt to taste
4-6 tablespoons butter

 1. Place the water, salt and butter in a pot or saucepan and bring to a boil.
2. Add the rice and boil vigorously for 2 minutes. Lower heat, cover tightly and simmer for 20 minutes. Do not disturb, let it simmer until the rice is tender. You know it’s done when little holes appear on the surface of the rice—and never stir while it’s cooking.
3. Turn off heat and allow the rice to rest for another 10 minutes before serving.
    Yield: 4 to 6 servings.

Enhanced by Zemanta
Older posts

© 2025 Oswald Rivera

Theme by Anders NorenUp ↑