Oswald Rivera

Author, Warrior, and Teacher

Category: pork (page 7 of 7)

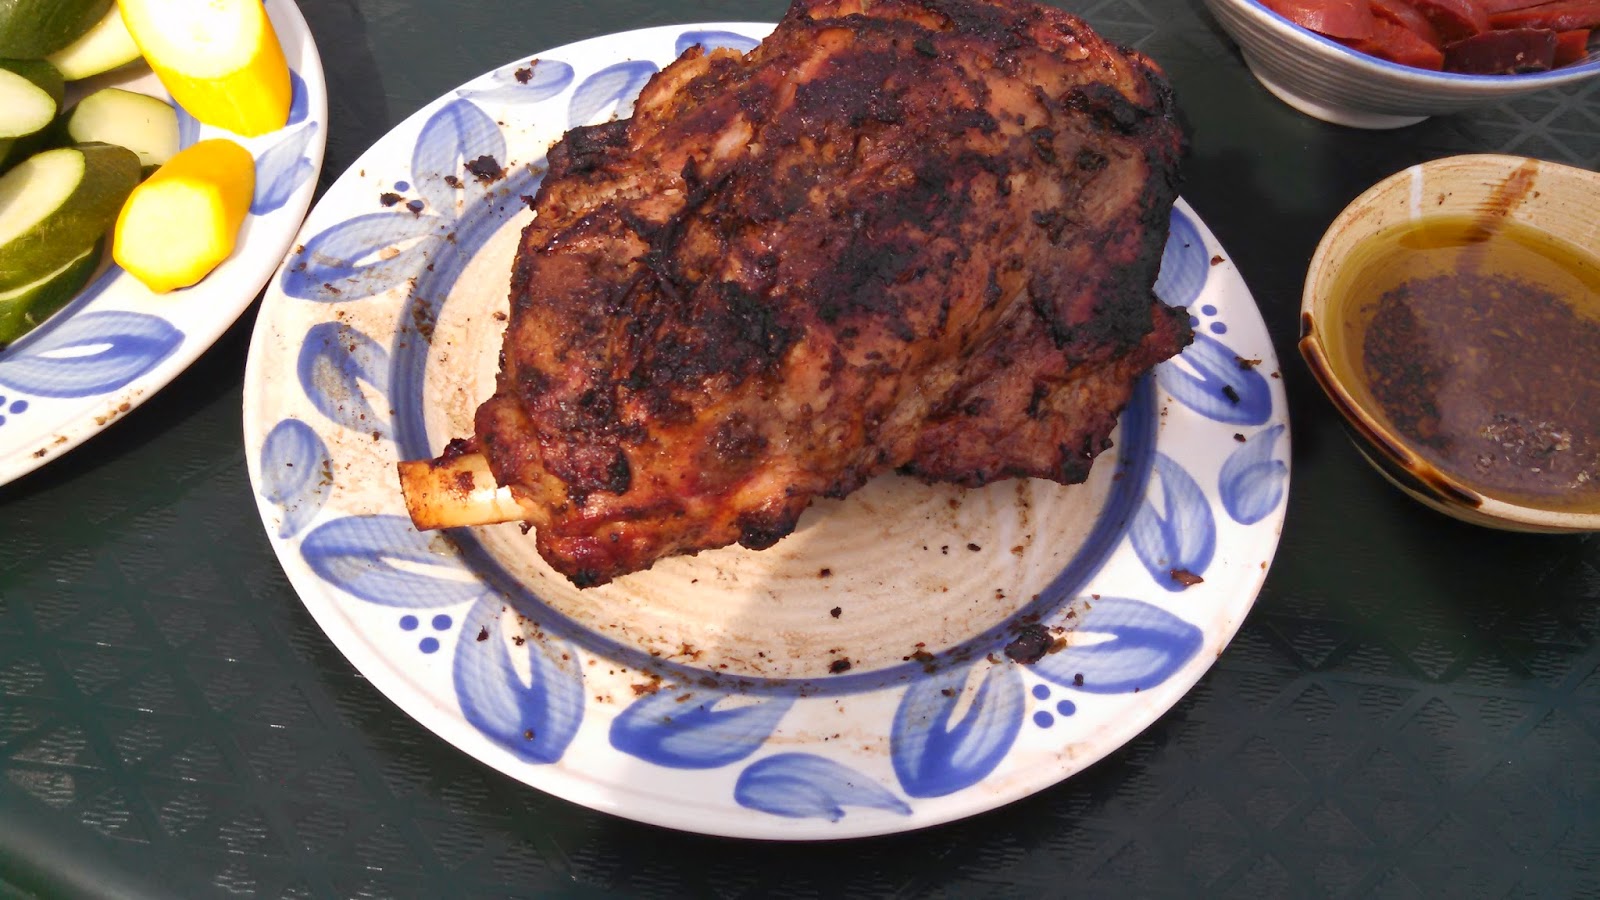
Grilled Marinated Mint and Mustard Lamb

It’s the waning days of summer, but we’re still grilling. One of my favorites is grilled lamb; which is a change from the usual barbecue steaks, hotdogs and burgers. But how to do it? Lamb offers so many possibilities. One of them is marinated lamb. My favorite method to grill lamb is just to prepare it highly seasoned with salt, pepper, oregano, and olive oil. However, recently I came across a recipe where the marinade consists of fresh mint and mustard. I love mint, and I love mustard. I was in heaven. As with any marinade, it’s best to marinate the lamb at least for four hours or, preferably, overnight. The rest is a snap—grill until done.

GRILLED MARINATED MINT AND MUSTARD LAMB

1 red onion, peeled and chopped
1 bunch mint leaves (reserve 1/4 cup finely chopped leaves)
2 tablespoons dry or regular mustard
1/4 cup olive oil
1 4-5 pound leg of lamb, trimmed, but with a thin layer of fat kept on (I know, it’s fat but, guess what,
   that’s what gives it the flavor. get over it.)
1/2 stick butter
4 cloves garlic, peeled and finely minced

Salt and freshly ground black pepper to taste

1. Puree the onion, mint leaves and mustard in a food processor. While the processor is running, add oil in a slow and steady stream.
2. Place lamb in a large zip-lock bag and pour in the marinade. Refrigerate for at least 4 hours or, preferably, overnight, turning the bag from time to time to distribute the marinade.
3. On the day of grilling, combine the butter, garlic, chopped mint, salt and pepper in a small saucepan or skillet. Warm over low flame until the butter melts. Set aside.
3. One hour before grilling, let the lamb sit at room temperature. If using charcoal briquettes, prepare an intense fire on half of the grill. If using a gas grill, heat to high.
4. Remove lamb from the marinade and place on the hot portion of the grill. Cook until browned (6-8 minutes). Turn and cook for 5-7 minutes more.
5. Move the lamb to the cool side of the grill and brush with the butter-mint mixture. Cover the grill and cook until the internal temperature reads 125 to 130 degrees (for medium rare). This usually takes 24 to 30 minutes more, turning and basting with the butter-mint mixture occasionally.
6. When done, place on a warm serving platter and let sit for 15 minutes before serving.
     Yield: 8-10 servings.

Kielbasa and Potatoes

 
No matter what the climate deniers may claim, the Polar Vortex is still with us, and it ain’t going nowhere. This calls for hearty food and drink. Forget about summer salads. One of my favorite dishes for this type of weather is kielbasa and potatoes—simple, hearty peasant cooking that fills the bill, and  is delicious to boot. Kielbasa, also known as Polish or Ukrainian sausage is a staple of Central and Eastern European cooking. It’s also very popular in the East and Midwest regions of the U.S. where large congregations of Eastern Europeans have settled. Raised in New York, I came upon kielbasa sausage early in. And I love it, whether cooked with onions, or peppers, or with kasha (buckwheat groats) or over rice. But my favorite is with potatoes. Nothing fancy, just spuds and red bell peppers and some bacon on  top. Can’t go wrong with this treat.

KIELBASA AND POTATOES

6 slices thick-sliced bacon, diced
1 large onion, peeled and sliced into thin rings
4 large potatoes, cooked (I like them with the skin on, but just cook them until just tender or semi-hard), and cut into 1-inch cubes.
1 Polish kielbasa or 1 pound Italian sweet sausage
1 red bell pepper, cut into 1-inch squares
Salt and ground black pepper to taste

1. In a large skillet, fry bacon until brown and crisp. Remove and set aside.
2. Add onion to drippings and sauté until golden brown. Add potato cubes and stir over low heat until potatoes are slightly browned, about 15 minutes.
3. Cook kielbasa in boiling water for 15 minutes. Drain and cut into 1/2-inch slices. If using sausages, brown on all sides in another skillet; cut into 1-inch slices.
4. Add kielbasa or sausages to potatoes. Add red pepper and stir over low heat for another 10 minutes. Season to taste with salt and pepper.
5. Pile on a serving platter and sprinkle with reserved bacon strips.
    Yield: 4 servings.

Enhanced by Zemanta

Ham Hocks and Beans

Back in my Marine Corps days one of the most memorable persons I met was Staff Sergeant Hollins. He was a warrior and lifer grunt who loved two things: the Marine Corps and ham hocks and beans. He would rhapsodize about the dish and how it was his favorite meal from boyhood onward. We knew that in the southern U.S., whether you were white or black, ham hocks and beans was, and is, a rite of passage. When I discovered how tasty it was I also became a fan of the dish.
I’m pretty certain Staff Sergeant Hollins would approve of the recipe given below. With a beer or, if you prefer, a hearty red wine such as a Cabernet or Chianti, nothing could be better.
1 pound dry pinto or navy white beans
4-6 smoked ham hocks (about 4-5 ounces each)
1 large onion, chopped
4 garlic cloves, peeled and minced
2 teaspoons dried oregano
1 teaspoon salt
1 teaspoon pepper
2 bay leaves
1. Soak beans in cool water for about 45 minutes. Drain, picking out any bad ones, gravel or rocks.
2. Place beans, ham hocks, onion, garlic, oregano, salt, pepper, and bay leaves in a large Dutch oven or pot. Fill with water until an inch to cover beans.  Bring to a boil, cover with lid and simmer on medium-low heat for 4 to 5 hours, stirring occasionally, adding more water if needed. Remove ham hocks when they are tender and meat fall off the bones. The longer you simmer the thicker the broth will become.
3. Remove ham hacks from the broth, and allow to cool so they can be handled.  Remove meat from the ham hocks, discarding fat and bones and return to the stockpot. Remove bay leafs, adjust seasonings to taste, if necessary, and serve (I prefer it with steamed rice).
    Yield: 4 servings or more.
Photo: Courtesy of heatherchristo.com

Mofongo


Mofongo, just like Mondongo, is a word of African origin. And like Mondongo, I love the word. “Mofongo,” pronounced just like it’s spelled. Mondongo, as described in a prior post, is a hearty stew. Mofongo is simply a mix of crushed green plantains with fried pork crackling, usually served with a sauce. I know, fried pork gets a bad rap now and then but, from time to time, this is a superb dish. Once you’ve taste it, you’ll be come back for more, I’m sure.

We Puerto Ricans adore mofongo. And we prepare it as individually shaped mofongo balls, similar to meatballs. Cuban mofongo differs from ours in that the mixture is shaped into one large ball which is served in a bowl. Modern variations have this type of mofongo stuffed with beef or seafood. Whatever method you prefer, it is a delicious appetizer, side dish or meal on its own. By the way, the recipe given is from my first cookbook, Puerto Rican Cuisine in America (Perseus Books Group).

Note that plantains these days are very easy to find. Almost every supermarket carries them. We even get them in our summer place in Vermont. They are a traditional root plant well known in the Caribbean, and are quite healthy for one. They are high in Vitamin A, potassium and fiber. They contain similar nutritional benefits as bananas. Can’t go wrong there.

MOFONGO (Plantains and Pork Crackling)

5 green plantains
1/2 pound salt pork, washed and diced
3 cloves garlic, peeled
2 tablespoons olive oil
Vegetable oil for frying

1. Peel plantains and cut into diagonal slices about 1-inch thick
2. Place plantains and diced salt pork in a pot with water to cover. Let soak for 10 minutes.
3. Drain and wipe both plantains and salt pork with paper towels.
4. Place salt pork in a hot skillet or frying pan (no extra oil is necessary). Stir-fry over high heat until pieces are browned and crisp (about 5 minutes) and set aside. This is know as the chicharron or pork crackling.
5. Deep fry plantains in hot oil until golden. Drain well on paper towels.
6. Crush plantains and pork crackling together in a wooden bowl or mortar. This may have to be done in batches depending upon the size of the bowl or mortar. Set aside.
7. Crush garlic cloves, and blend in olive oil. This is best done in a mortar, if you have one, or any small bowl will do.
8. Add garlic-oil seasoning to the plantains and crackling, and mix thoroughly.
9. Scoop up a tablespoon of the mixture and shape into a ball (about 2-inches in diameter, or larger if desired). Repeat until mix is used up.
10. Serve by itself or with favorite sauce or gravy.
Yield: 12 or more mofongo balls.

Reblog this post [with Zemanta]
Newer posts

© 2025 Oswald Rivera

Theme by Anders NorenUp ↑