Oswald Rivera

Author, Warrior, and Teacher

Page 71 of 85

Broiled Tuna Sandwiches

I’m an aficionado of canned tuna fish. Have been all my life. Like most Americans, it’s mainly been in the usual tuna fish sandwiches. You know the deal: 2 slabs of bread and tuna mixed with gobs of mayonnaise. Canned tuna has so many uses. Back in Spanish Harlem, during my salad days, we use to make a quick meal of canned  tuna fish over rice. Simple and delicious. But the sandwiches remained our usual standby. And in our experimenting with tuna sandwiches we came upon our favorite: broiled tuna sandwiches (of which the recipe is given below).

It should be noted that in the U.S. 52% of canned tuna is used for sandwiches. While 22% is for salads, and 15% is for other uses such as casseroles. Canned tuna comes in 2 variations: Chunk Light and White Albacore (also known as “solid white tuna”). Chunk light tuna comes from darker species of tuna and is considered not as good as solid white. The interesting thing is that chunk light contains lower levels of mercury than albacore white and thus it’s healthier for you. According to the American Medical Association, canned tuna contains various levels of mercury. So,  for young children it should be limited to no more than 2 meals a month. Whereas chunk light should be limited to 3 meals a month. All this is off-set by the fact that canned tuna is a good source of Omega-3 fats that help reduce cardiovascular disease.

BROILED TUNA SANDWICHES

2 cans (5-oz) tuna, flaked
1 cup chopped celery (about 2 large ribs)
1/4 cup mayonnaise
1 clove garlic, finely minced
1/4 teaspoon dried oregano
Freshly ground black pepper to taste
4 hamburger rolls, split and toasted (or 8 slices toast)
Grated Parmesan cheese to taste

1. In a bowl mix all the ingredients except the rolls and Parmesan cheese.
2. Spread rolls on a baking pan or cookie sheet, and spread with the tuna mix to cover. Sprinkle with Parmesan.
3. Broil about 6 inches from heat source until bubbly (about 5 minutes).
4. Cover with roll tops. Cut each roll in half and serve.
    Yield: 4 servings.

The Power of Grits

I came across grits, that all-American gem, while stationed down South during my time in the Marine Corps. And I got to love them. I was, and remained hooked on grits. This archetypical Southern staple is like no other. Strange that a kid from Spanish Harlem should become so enamored of this dish but, then, why not?

Grits are of North American Indian origin. It is simply coarsely ground corn. The preferred version in the South is hominy grits. This is field corn that is soaked in lye water (what in the old days was known as potash water). The corn kernels swell to twice their size, and are then dried and ground. Hominy as an Indian food goes back to at least 5,000. When European colonists came to the Americas, the Indians taught them how to make it. Hominy comes in three varieties: fine, medium or coarse. A newer innovation, quick grits, is very fine grain that has been pre-steamed. But no real Southerner would ever eat or cook quick grits. That would be sacrilege. To them the old-fashioned stone ground gits is the real deal.

Grits comprise the typical Southern breakfast. They are nominally served with butter, sausage, country ham or red-eye gravy. The words “grits” is derived from the Old English “grytt,” meaning coarse corn meal. As such grits is similar to corn-based porridges such as the Italian polenta and the ever popular farina. Besides breakfast, grits has another use: when I was down South they would take leftover cold grits, slice it like bread and fry the slices in oil. Another way to enjoy this heavenly item.

When making grits, the rule of thumb is that grits it will consume four times their volume. So, for 1 cup of grits use 4 cups or water or chicken stock, and simmer for 20-25 minutes until the liquid is absorbed. I recall that grits was popularized in the 70s TV series Alice where the waitress, Flo, working at Mel’s Roadside Diner, would always exclaimed, “Mel, kiss mah grits!” And, just one more fact, there’s even a World  Grits Festival held yearly in St. George, South Carolina.

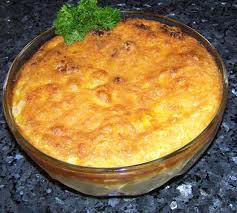
The recipe given below is simply grits cooked with onion, garlic, nutmeg, red pepper, Cheddar cheese and eggs. Then the whole thing is baked in a casserole. Another innovative way to cook grits, and it’s scrumptious.

CHEESE BAKED GRITS

1 cup grits
4 cups boiling water or chicken stock
Salt to taste
2 tablespoons butter or margarine
1 medium onion, chopped
1 clove garlic, finely minced
1/4 teaspoon grated nutmeg
1/2 teaspoon crushed red pepper
2 cups grated sharp Cheddar cheese
4 eggs, separated

1. Stir grits into boiling water or stock. Add salt and cook until soft.
2. As the grits cook, preheat oven to 350 degrees F.
3. In a small pan, melt the butter and saute the onion and garlic until soft.
4. Add to the cooked grits along with the nutmeg, red pepper and Cheddar cheese. Stir to combine.
5. Let cool slightly and add the egg yolks.  In a small separate bowl beat egg whites until stiff and they  hold soft peaks. Fold into grits mixture.
6. Spoon mixture into a casserole (about 2 quarts). Here I prefer to use a cast-iron pan. But any good baking pan or souffle dish will do. Place in oven and bake for 25-30 minutes until desired degree of doneness.
    Yield: Six or more servings.
   

Frogs’ Legs Provcencale

I know, you’re saying, “Frogs’ legs—what the f . . ..” Yes, kiddies, frog’s legs. That’s the recipe I want you to try. Now, hear me out. I admit, it’s most likely not your usual tidbit, and it’s mostly associated with hoity-toity French cuisine. Yet did you know that frog’s legs is a delicacy of Cantonese cooking, as well as Thai, Vietnamese, Portuguese, Spanish, Greek and Italian cuisine? Not to mention, it’s also popular in the southern regions of the U.S. In Indonesia it’s a national dish in the form of Swikee Kodok Oh, or frog’s legs soup usually served with rice. So, don’t get bummed out. It’s a favorite dish of a lot of people, not just our French brethren. Frog’s legs have a mild, enticing flavor similar to fish. They are also rich in protein, omega-3 fatty acids (the good kind), vitamin A and potassium. Figure it this way: the suckers are good for you.

The historical record shows that frogs’ legs were popular in southern China as early as the first century of the Common Era. The Aztecs also had a yen for them. But, ironically, it was the Catholic Church that made them a staple in France.  Early on, the church had a prohibition on eating meat on a certain number of days during the year, the most common being Friday. Gluttonous monks in France got around this by qualifying the frog as a fish, and not as a meat item. Naturally, since frogs grew wild during that time, hungry peasants got into the act by dutifully following the monk’s (and the Church’s example) and eating the frogs. And a national dish was born. They became so endemic with French cuisine that the favorite insult toward the French is referring to them as the Frogs.  

The dish crossed the Atlantic by way of Louisiana, where the French speaking Cajun folk popularized it in New Orleans. And to this day they still enjoy it either deep-fried, sometimes breaded and sometimes not. Now, don’t get turned-off by it. Check out the recipe. Give it a chance. It might surprise you.  Where can you get frog’ legs? Well, at most large supermarkets these days (most often in the seafood section). Barring that, at specialty food stores, and even on-line. They are usually sold frozen and already cleaned. Most Asian markets carry them, sometimes even fresh. For the more adventurous, you cay buy whole bullfrogs that can be cleaned and skinned at home. If you manage to get these, you can trim off the skin as if you were sliding off a glove from the legs. Then soak the legs in cold water for 2 hours before cooking to mellow out the flavor.

For the recipe given, you can use farmed or wild frog legs. Farmed legs tend to have a lighter hue, whereas their wild cousins have a richer, gamier taste. Most frogs’ legs are roughly the size of a small chicken wing. In all cases they should be plump and have a nice pink color.

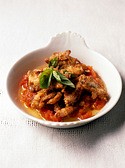
FROGS’ LEGS PROVENCALE

12 large pairs of 24 small pairs frog’s legs
Cold milk to cover (whole or 2%)
1 can (1lb. 12oz) crushed tomatoes
2 cloves garlic, peeled and finely minced
Flour for dredging frogs’ legs
1/4 teaspoon dried oregano
Salt and freshly ground black pepper to taste
1/2 cup vegetable or corn oil
1/2 stick butter
1/4 cup finely chopped parsley

1. You need to keep the frogs’ legs flat as they cook. This is done by inserting one leg in between the two muscles of the lower part of the other leg.
2. Place the legs in a bowl and add cold milk to barely cover.
3. Place the tomatoes, undrained, in a small saucepan. Stir in the garlic and bring to a boil. Lower heat and simmer for 20 minutes. Remove from heat and set aside.
4. Meanwhile, blend the flour with the oregano, and salt and pepper to taste. Remove one pair of legs at a time from the milk and dredge in flour, turning to coat well.
5. Heat oil in a large skillet or fry pan, add butter and, when it is quite hot, add the legs. Cook until golden on  one side. Turn and cook until golden on the other side.
6. Transfer the legs to a serving dish and arrange them neatly in one layer.
7. Quickly heat the tomato sauce and spoon it over the legs. Sprinkle with the chopped parsley and serve with a crusty loaf of bread.
    Yield: 4 servings.

Clams for St. Valentine’s Day

St. Valentines’s day is just around the corner. Guys and gals, this time around instead of going out to some overpriced restaurant, why not cook your honey a sumptuous, extravagant meal featuring clams. Yes, clams. Why? Because clams throughout history have been regarded as an aphrodisiac. In other words, a sex stimulant. So what better way to celebrate the holiday? Casanova, the great lover himself, touted clams as a great aid in his many conquests. And, you know what? It ain’t too far off the mark. In 2005, in a study by Italian and American scientists, it was discovered that amino acids found in bivalves (clams, oysters, mussels, ext.) had the potential to raise sexual harmone levels. The study itself was conducted on a species of Mediterranean mussels that showed these bivalves contained amino D-aspartic acid and N-mythyl-D-aspartic acid that induced sexual harmone production in rats. There have been no follow-up studies to measure the impact on humans, but for all you out there who love shellfish, it’s great news.

To our forebears, even before science got into it, clams were regarded as an aphrodisiac because (as some noted) their plump flesh was likened in appearance to testicles. It stands to reason why someone like Casanova and, many others, would scarf up clams at the dinner table and elsewhere. But more. Let’s put it in serious perspective. A single serving of clams provides more than 100 percent of the daily allowance for iron. They are also a source of protein—which is excellent for sustaining energy. Do the math. But even for those of us who don’t consider clams as appetizing, they are delicious as in the following recipe in which they are prepared in a green sauce. This is a dish that is very popular in Spain. And believe me, you’re beloved will be very impressed and more. Serve the clams and sauce atop plain white rice and you will have a very interesting and, hopefully, entertaining evening on St. Valentine’s Day.

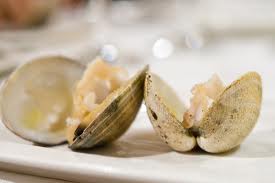
ALMEJAS CON SALSA VERDE
     (Clams with Green sauce)

About 24 to30 littleneck clams
1/4 cup olive oil
2 cloves garlic, finely chopped
1/4 cup chopped scallions
Freshly ground black pepper to taste
1/4 teaspoon dried oregano ( or 1/2 teaspoon fresh)
1/2 cup  dry sherry
3/4 cup fresh or canned clam juice
1 tablespoons butter
2 tablespoons flour
2-3 tablespoonswater
Salt to taste
1/2 cup chopped parsley
Hot cooked rice

1. Have the clams opened at the fish store, or open them by hand with a knife or clam opener. However, open the clams on the half shell, discarding the top shell. Leave the clam attached to the bottom shell. Reserve the clam liquid.
2. Heat the olive oil in a skillet or fry pan (I prefer cast-iron) until it’s very hot. Then add the clams on the half shell and garlic. Cook, stirring over high heat about 30 seconds. Be aware that if you cook them any longer the clams will toughen, and you don’t want that. Add the scallions, pepper, oregano and sherry. Add the clam liquid, clam juice and butter, and bring to a boil.
3. In a cup quickly blend the flour and water and stir it into the clam sauce. Stir until thickened. Add salt to taste. Stir in the parsley and mix.
4. Serve over rice.
    Yield: 4 servings.

The Myth of the Dim Mak “Delayed Death Touch”

Every so often, in one of my wu-su martial arts classes someone always inquires about the so-called Din Mak “death touch.” This usually comes about when we start teaching the concept of Chin Na Fa. “Chin” in Chinese means to “to seize of catch,” and “Na” means to hold and control. It’s a style  that uses joint lock manipulation, chokes, throws, and pressure point attacks. It’s the pressure points that get people to inquire as to Dim Mak. Simply put, in Chin Na, pressing techniques are used on nerve endings to cause extreme pain and/or unconsciousness. This is a far cry from the Din Mak “delayed death touch,” which everyone wants to learn.

Chin Na does make use of “Duann Mie” (another word for Dim Mak which involves sealing or blocking the vein/artery by pressing). This can also involve cavity pressing or meridian pressing, which exemplifies Dim Mak. According to ancient Chinese medicine, the body’s life force (Chi, Qi or Ki) travels though invisible channels called meridians. Any disruption in the flow of this Chi force can cause illness or disease. The meridian flow concept is prevalent in the use and theory of acupuncture whereby needles are inserted into different points on the meridians in order to counteract an illness. Din Mak evolves along the same theory: attack the points and you disrupt the flow of energy, thereby causing injury or death. 

There is no question  that attacking a nerve ending or pressure point can do great harm. A thumb press on the left common carotid artery (just below the ear) can block blood flow to the brain and result in unconsciousness or worse. And there are numerous pressure points that we study on the body that can have similar affect. Also, a blow to a vital part of the body can also result in injury. Note that one of the most common cause of sudden cardiac arrest in young athletes is a condition called Commotio Cordis, where a non-penetrating blow to the chest occurring within a specific portion of the cardiac cycle can cause severe trauma. But this is a far cry from the “death touch.”

What is controversial about the Dim Mak concept is this idea that that you can attack someone simply by touching a vulnerable area and producing a delayed reaction whereby the subject incurs death hours or days later. Medically speaking, there are instances of a delayed reaction due to an injury. You get into a situation where you sustain an injury and you don’t treat it, after a while it’s going to get worse. You sustain a strike to the kidneys and you start peeing blood, and you don’t see a medical person right away, you have problems. But a delayed injury by mere touch, without the subject even feeling or knowing until the time of death? This leads to much debate and controversy, and skepticism on the part of many.

This controversy was fueled in part by a 1985 article in Black Belt magazine which attested that the death of fabled Kung-Fu icon Bruce Lee in 1973 was due to a “delayed reaction to a Dim-Mak strike he received several weeks prior to his collapse.” Following in this vein, others attested that Bruce Lee may have been the victim of the “Quivering Palm technique” which also incurred a delayed reaction. I remember an episode from the  1970s TV series Quincy, starring Jack Klugman, whereby a martial arts movie star dies mysteriously while making a movie. And guess what? Dr. Quincy discovers that it was due to a Dim Mak strike 10 days earlier.

Let’s put it in perspective. This “delayed death touch” business has become fodder for TV and action movies. In the 1990s karate instructor George Dillman invented a style called Kyushojutsu that he claimed had qi-based attacks without physical contact, the “no-touch knockout” techniques.” Upon third-party investigation the whole thing was denounced as fraudulent. Another parctiioner, Erle Montaigue, published a number of books and videos on Dim Mak. He claimed that he had learned the technique from a master named Chian Yiu-chun. Problem was, as Montaigue later stated, this master was an illegal immigrant, making his existence very difficult to verify.

Now, I’m not saying that this delayed death touch may or may not exist. If you believe in your mind it exists, then it does. If you don’t believe so, then it doesn’t. Just as if you believe Voodoo exists, it does. If you don’t believe so, it doesn’t. Just be aware that if you come across an instructor who states he can teach you the “delayed death touch” or the “five point palm exploding heart technique” (as shown in the Kill Bill Vol. 2 movie) and assures you it can be done if you pay up ex-amount of dollars, head for the door. That person may be a charlatan, and is taking you for a ride.

Enhanced by Zemanta

Sancocho

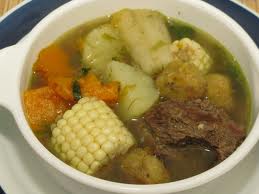
Now that the weather has gotten a mite chillier (finally), our thoughts turn to warm, hardy comfort foods. Sancocho is such a variety. It is the archetypal Puerto Rican stew. It’s hearty and stick to the ribs fare.Think of the French cassoulet where pork, beans, lamb and sausages are all mixed together in a casserole. In that vein there is Nabiaki Udom which calls for chicken or beef or anything else on hand thrown into one dish. Also the Chinese Congee would come to mind. You get the idea, put everything together in one pot and let it simmer until it’s rich and thick. Sancocho follows along the same lines with an assortment to vegetables which are added to a broth. The vegetables include root plants such as yuca, also known as cassava; yautia (ya-oo-teah), also called tanier or dasheen; and name (nyah-meh), a starchy root.

In Puerto Rican slang, sancochar means to boil ot stew. Thus the sancocho moniker since it is a platter containing pork, chicken and what have you. Sancocho takes time and patience to cook. But it’s worth the effort. The result is an ultimately superior meal in itself.

The recipe below is from my first cookbook, Puerto Rican Cuisine in America (Avalon Books-Thunder’s Mouth Press). The root plants (or bianda) can be found in any Asian or Caribbean market. Cassava is a common product these days, no problem there. If you can’t find yautia, then substitute turnips, and for name, you can use yams.

SANCOCHO

1/2 cup olive oil
1 medium green bell pepper, cored, seeded and chopped
2 cloves garlic, peeled and crush
3 aji dulce (sweet chili pepper), seeded and chopped
6 fresh cilantro leaves, washed and chopped
1 pound boneless chuck beef, trimmed of fat and cut into 1-inch chunks
1 pound pork shoulder, cut into 1-inch chunks
1 medium stewing chicken (about 2 1/2 pounds) washed and cut into serving pieces
1 teaspoon ground black pepper
1 teaspoon dried oregano
2 ears fresh corn, shucked and quartered
1/2 pound yuca, peeled and cut into 1-inch pieces
1/2 pound yautia, peeled and cut into 1-inch pieces
1/2 pound name, peeled and cut into 1-inch pieces
1/2 pound pumpkin, peeled and cut into 1-inch pieces
3 green plantains, peeled and quartered
1/2 cup tomato sauce
1 teaspoon salt

1. Heat oil in a large kettle or Dutch oven and add bell pepper, onion, garlic, aji dulce and cilantro. Saute over moderate heat until tender (4-5 minutes).
2. Add beef, pork, chicken, pepper, and oregano. Cook until meat is browned (8-10 minutes).
3. With a slotted spoon, remove chicken parts from pot and set aside.
4. Add corn, yuca, yautia, name, pumpkin and plantains to meat.
5. Add water to cover contents in pot, also add tomato sauce and salt. Bring to a boil. Cover, lower heat and simmer for 30 minutes.
6. Add chicken and continue to cook on low heat until meat is tender (about 2-2 1/2 hours).
7. Uncover pot and remove plantains. Place in a bowl and mash with a potato masher or big spoon. Let cool for a few minutes. Form into small balls with palms of hand. Return to kettle and boil for 1-2 minutes.
8. Serve with a loaf of crusty bread.
    Yield: 12 servings.

Enhanced by Zemanta

Ipocras

During winter and, especially the holiday season, it is customary to drink wine infused with spices, such as mulled wine or “hot wine.” Spiced wine goes back to Roman times and, during the Middle Ages, the most popular drink of all was Ipocras (or Hipocras). This was a mixture of wine, cinnamon, sugar and ginger. In some recipes nutmeg was also added. Ipocras was taken at the end of a meal as a digestive. That means it was beneficial to the internal plumbing. It was a drink of the highest nobility and it was served to Queen Elizabeth I at her coronation.

It was also a drink that defined your station in life. According to a very old cookbook, Forme of Cury (1390), Ipocras made with sugar is destined for the lords. Ipocras made with honey is for the people. Sugar was a very expensive commodity in those days which only the higher classes could afford it. Luckily, today, those of us in the 99 percent can afford sugar as well as honey. So think of drinking Ipocras as a way to get back at the one percenters. Whichever way you look at it, it makes for a great beverage during these cold, chilly days. Hell, it’s a great drink for any season since it can be served at room temperature or slightly chilled. 

The recipe given is by one Ruperto de Nola from his cookbook, Libro de Guisados (Book of Stews), the 1529 edition. Ruperto was cook to King Fernando of Naples.

The Middle Ages is not known for its gastronomy. But this drink seems to have gotten a lot of people through those Dark Ages.

IPOCRAS

1 1/2 cups red wine
1 1/2 cups dry wine
1 teaspoon powdered cinnamon
1/2 teaspoon powdered cloves
1/8 teaspoon powdered ginger
2 tablespoons sugar (or more to taste)

1. Combined all of the ingredients in an enameled or heat-proof glass pot.
2. Bring slowly to a boil.
3. Once it starts boiling, remove from heat. Strain though cheesecloth or a cloth sieve set over a bowl. Serve at room temperature, or slightly cool, in mugs or (if you want to be fancy about it) wine glasses.
    Yield: about 2-3 cups

Potato Pancakes

Potatoes have been with us since the beginning of time. But it was the Spanish conquistadors who brought it to Europe from Peru in the 16th century. Funny thing is that it wasn’t until the 1800s that potatoes gained currency throughout most of Europe and became the common staple we know today. It’s popularity is understandable. It is one of the most versatile of foods. Yet, over time it has become routine. We serve them fried, baked or mashed. Our Jewish brethren, during the Hanukkah festival. make them in the form of latkes, or potato pancakes. But, just like with rye bread, you don’t have to be Jewish to enjoy potato pancakes. They are easy to make; and are a well-deserved change from the usual fries.

One can have potato pancakes for breakfast, lunch or dinner. They make a great side dish with ham, steak or chicken. Or you can enjoy them simply with applesauce or sour cream.

Given below is a basic potato pancake recipe. I’ve learned through experience that it’s convenient to keep them warm in a low oven depending on time constraints. Believe me, once you’ve tasted these suckers, they’ll become a regular event.

BASIC POTATO PANCAKES

4 large russet potatoes, peeled
1 medium red onion
2 cloves garlic, peeled
1/2 cup parsley or cilantro leaves
2 eggs, lightly beaten
Salt and ground black pepper to taste
3-4 tablespoons all-purpose flour
Vegetable oil for frying (about 2 cups)

1. In a food processor, grate the potatoes, onion, garlic and parsley (or cilantro). Using a rubber spatula or wooden spoon, scrape into a large bowl. Drain off any excess liquid.
2. Mix in the eggs, salt and pepper. Add enough flour to the mixture to make it thick (about 3-4 tablespoons should do it).
3. Preheat oven to low (about 200 degrees F. or 95 degrees C.).
4. Heat a large heavy skillet or pan (I prefer cast iron) over medium heat. When hot, add oil to generously coat the bottom of the pan (about1/4-inch oil should be sufficient). Drop two or three 1/4-cup batter into hot oil, and flatten to make 1/2-inch thick circles. Fry, turning once, until golden brown (about 4-6 minutes per side). Drain on a plate lined with paper towels, and repeat until all the batter is used. Keep warm in the low oven until serving time.
     Yield: 4 servings.

Women in Combat

On Veterans Day, November 11th, I attended a screening of a remarkable new documentary feature, Service: When Women Come Marching Home. This thought provoking work by Marcia Rock and Patricia Lee Stotter examines the role of women veterans with regard to how they transition from active duty to civilian life. This is new territory. We know about the plight of the GIs coming home, mostly men, and this has been chronicled before, from the World War II post-war movie, The Best Years of Our Lives (1946), to modern renditions such as The Hurt Locker (2008). But a discussion on the plight of women in our services is still relatively new. Yes, women do serve, with distinction, and they undergo the same travails as their male counterparts, be it casualty-sustaining wounds or PTSD (Post Traumatic Stress Syndrome).  Yet, they are relegated to the background. It’s as if we don’t want to acknowledge or confront the fact that they labor and sweat alongside  the menfolk.

After the screening, there was a question-and-answer session regarding the documentary. Along with Ms. Rock and Ms. Stotter, two of the four other ladies featured in the film also took questions from the audience. The two female veterans were Sue Downes and Mariette Kalinowski. Corporal Downes served in Iraq, where she lost both her legs below the knee due to a landmine explosion. Sergeant Kalionowski served two tours as a gunner, manning a 50-caliber machine above a humvee.

During the session, I asked a question, that is always bound to draw a mixed reaction. To wit: if it became official policy that women were to serve in front-line combat, would that changed the perception we have of females serving in a war zone? This question, to me, is the crux of the matter. It is a fiction that women are not serving in combat situations already. The official government policy is that woman do not serve in combat. But, as Ms. Kalinowski and, particular, Ms. Downes show, this is not entirely true. The fact is, we have women facing enemy fire just like the men. This fiction is explained in the policy that women serve in support roles. That is, hauling supplies, doing medevac work, military police, inventory, etc. Except, as the present wars have shown, and Vietnam before that, in a guerrilla war, the people in the rear are just as exposed to enemy attack as those in the trenches. 

The support-role concept goes back to the universal idea we have of women in general. They are the nurturers, the givers, the ones who maintain home and hearth. To think of women as fighters is anathema to some. If the powers that be in the military ever decided that yes, women should legally be in combat, that would change our cultural values and perceptions regarding females. Are we ready for that? Are we ready to accept the notion that our wives, mothers and daughters be trained as killers? Can we view them as such? It would mean a major sea change in our perceptions. Most would say that Americans are not ready for that.  But history has shown differently. In 1948, at Israel’s founding, both men and women served in combat situations. In the former Soviet Union, during the Second World War, women fought on the Eastern Front to combat the Nazi menace. The concept of women as warriors in not new; in fact, it’s very old.

I have no problems with women serving in actual combat. If a female has the training and the ability, I see no reason why she shouldn’t be in a rifle platoon or a special ops unit. Both Ms. Kalinowski and Ms. Downes put a lie to this concept of woman as weak and ineffectual. Ms. Downes lost limbs serving her country. She merited her Purple Heart the same as I and countless others, and received numerous decorations to boot. She had nothing to prove to anyone. She is a warrior. For women like her, and Ms. Kalinowski, who display singular courage, valor and, yes, heroism, they should be welcomed as brothers-in-arms.

Enhanced by Zemanta

A Mess of Pottage

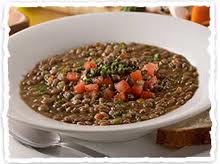
The first biblical account of a dish of food affecting human behavior occurs in Genesis 24:29-34, the first book of Moses, where Esau sells his birthright to his younger brother, Jacob, for a  “mess of pottage.” What we are talking about here is lentils, that Old World legume that is beloved in the Rivera family. Lentils are akin to liver. You either hate them or love them. And it’s interesting that this is the first food given a biblical reference.This is a big deal by all accounts. Esau was a “cunning hunter; a man of the field; and Jacob was a plain man dwelling in tents.” Except that Jacob was the cunning one since he got his older brother to renounce his heritage for a plate of red lentils. Jacob was the grandson of Abraham, the patriarch of three of the world’s greatest religions. And it was Jacob who gave his people, the Israelites, a national conscience. It could have been Esau—had it not been for those pesky lentils, and the fact that he was starving. So one shrewd brother flimflams the other, and history is changed.

And what was so great about this freakin’ recipe? Actually, not much. No ingredient list is given in the Bible. Esau had come in from the fields and he was famished, simple as that. The story fascinates me and I’ve tried to emulate the recipe as Jacob, or his wife, would have prepared it. Onions, garlic and tomatoes were a staple in Ur, the important city in Mesopotamia (read modern day Iraq) during the fourth and third millenia B.C.E. Genesis 11:31 says that Abraham, originally Abram, migrated from “Ur of the Chaldeans” to the land of Canaan. In Ur they also had spices such as salt and pepper. I’m sure all these provisions were taken on the trek to the land God promised to the Israelites.

The recipe given is quite simple, just enhanced by natural ingredients. It comes from my second cookbook, The Pharaoh’s Feast (which was also published in England under the title Feasting with the Ancestors).

When I make lentils, I use it in conjunction with rice. Gives the old rice and beans combo a new twist. Lentils, like other dried beans, are quick and easy to prepare.  They may be sold hold or split into halves, and are good for you, providing a healthy source of cholesterol-lowering fiber. Which means they are good in preventing heart disease. They are also contain B-vitamins and protein, and virtually no fat. A whole cup of cooked lentils provides just 230 calories. Can’t go wrong with these suckers.

A MESS OF POTTAGE

1 cup dried lentils
4 cups water
3 tablespoons olive oil
2 medium onions, peeled and sliced from the stem down into 1/2-inch thick moons
2 clove garlic, peeled and minced
Salt and ground pepper to taste
2 ripe tomatoes, sliced into half-moons

1. Wash lentils under cold running water.
2. In a large pot or casserole (a Dutch oven is good for this), cover the lentils with water. Cover the pot, bring to a boil, and cook over medium heat for 10 minutes.
3. Meanwhile, heat the oil in a medium skillet and add the onions and garlic. Saute for about 3 minutes or until the onions brown at the edges.
4. Add the onions and garlic to the lentils, plus the salt and pepper. Simmer over low heat, stirring occasionally, for 30 to 45 minutes until the lentils are tender adding, more water if the mixture becomes too thick.
5. Serve garnished with tomatoes.
    Yield: 4 to 6 servings.

Enhanced by Zemanta
« Older posts Newer posts »

© 2025 Oswald Rivera

Theme by Anders NorenUp ↑