Oswald Rivera

Author, Warrior, and Teacher

Category: desserts (page 3 of 3)

Baked Apples

Vermont in the fall is glorious. We spend our days here in the summer and, sometimes, we come back in the fall to see the foliage with all its vivrant colors. The other thing we note is that there are apples everywhere: apples falling from tress on the roads, in back yards, on dirt paths, you name it. Here in the property where we’re at we also have apple trees. Thus, since the summer, I’ve gotten into the habit of eating apples for snacks and as dessert.

According to the medical journals, apples are good for you.  They are high in antioxidants, that substance that is good for the heart. Apples enhance lung function, help build strong bones and thus prevent osteoporosis, and provide dietary fiber (which is great for those who want to be regular, if you know what I mean). And all that without any fat or sodium.

In Vermont the locals love to make apple pies and apple cider. Those are good, but my favorite apple recipe is simple baked apples. It’s easy, and can be done with any apple variety. In our area, the usual varieties are crab apples and, what I think are red delicious. They are sweet, juicy and crisp. The recipe given is the simplest there is. Just flavor with some syrup (maple or any other syrup such as hazelnut), or plain honey, and bake. The easiest fat-free dessert.

BAKED APPLES

4 apples (any combination or whatever is available), cored, halved, and sliced thinly
5 tablespoons maple syrup or honey
Ground cinnamon

1. Preheat oven to 375 degree.
2. Place apples in a baking dish (I prefer cast-iron).
3. Drizzle syrup or honey on apples; and dust lightly with cinnamon.
4. Bake 30 minutes or until fork tender.
    Yield: 4 servings or more.

Enhanced by Zemanta

Kugel for Passover

One of the most festive of Jewish holidays is upon us, Passover. This is the ritual retelling of the liberation of the ancient Hebrews from bondage  in Egypt. This is all immortalized in the Passover Seder, that gathering of family and friends to commemorate the occasion. At the Seder table the retelling is done from reading the Haggadah, an ancient work derived from the Mishnah, which is a compendium of Jewish oral tradition.

The Seder table highlights certain foods which are a must for this traditional holiday. Among these is Charoset (my favorite), a mixture of chopped fruits and nuts. It’s a brown, lumpy concoction which recalls the mortar used by the Hebrews to build the storehouses of Egypt. Whatever its appearance, it’s truly delicious and flavorful. Charoset serves to soften the taste of the bitter herbs (another traditional item) featuring grated horseradish and romaine lettuce. Other dishes served may include matzo ball soup, gefilte fish, roast chicken  (another holiday standby), brisket, turkey, and lamb. The latter is popular among Sephardic Jews, that is, those Jews whose descendants hail from the Mediterranean and the Middle East.

The one dish that I enjoy most is kugel, typically considered a side dish. Kugel is a  sweet pudding or casserole made from noodles or potatoes. The word itself is Yiddish for “ball.” It is Ashkenazi in origin. Ashkenazi Jews are those descended from medieval Jewish communities in Eastern Europe.

The kugel recipe given below is courtesy of my dear friend, Paul Goldstein. Me and Pablo go back a long ways. We first met in the 60s, and both of use are still alive and kicking. Pablo’s kugel is so good it can be served on its own. And even if you aren’t Jewish, you can still enjoy this savory creation on any occasion—even for Easter.  

PABLO’S KUGEL

8 ounces of egg noodles
2 eggs, lightly beaten
2 golden apples, peeled and cut into bite-sized pieces
1 pear, peeled and cut into bite-sized pieces
1/4 cup raisins

1 teaspoon cinnamon

1.  Preheat oven to 350 degrees.
2. In a pot or pan, cook noodles according to package directions. Drain and rinse under cold running water, and put back in the pot.
3. Add apples, pear, raisins, eggs and cinnamon. Mix well.
4. Grease a skillet (preferably cast-iron) with butter or margarine. Pour mixture into the skillet, and bake for 1 hour or until top is brown.
    Yield: 4 servings

Note: Kugel can be eaten either hot or cold. You can also serve it with apple sauce or sour cream. If you really want to be decadent, try with vanilla ice cream.

Enhanced by Zemanta

Rice Pudding


For the holidays we Puerto Ricans have our own versions of desserts. The most popular is arroz con dulce. Simply, rice pudding. The literal translation of arroz con dulce is “sweetened rice.” A more appropriate term would be sweet coconut rice. Coconut milk is the main component of the dish. In my first cookbook, Puerto Rican Cuisine in America, I give the recipe using a fresh ripe coconut. If you want to be traditional and use a genuine coconut, you are welcomed to get the book and try the recipe. For those who don’t have the time to crack open and prepare a coconut, I give below a quicker recipe using canned coconut milk or cream. In either case, the recipe is marvelous and delicious. Believe me, this is not your ordinary rice pudding recipe. As a dessert, it sets the bar pretty high.

ARROZ CON DULCE (Rice Pudding)

2 cups either long grain or short grain rice
2 cups canned coconut milk or cream
1 5-ounce can evaporated milk
1 teaspoon ground cinnamon
1 teaspoon ground cloves
1 teaspoon salt
1/4 teaspoon vanilla extract
1/2 cup seedless black raisins
1 1/2 cups brown sugar
1 teaspoon butter or margarine
1/2 cup cracker crumbs

1. Wash rice at least three times in cold water and drain to rid it of starch. What in Pennsylvania Dutch country is known as “washing in several waters.”
2. In a heavy kettle or pot, heat one cup water. When it comes to a roiling boil, add rice, coconut milk, evaporated milk, cinnamon, cloves, salt, vanilla, raisins, sugar and butter. Cook on moderate heat, stirring frequently with a wooden spoon, for 35 minutes or until rice is tender and most of the liquid has been absorbed.
3. Spoon into a round serving platter or large pie plate.
4. Sprinkle with cracker crumbs and allow to cool at room temperature before serving.
Yield: 10 0r more servings.

Enhanced by Zemanta

Cooking With Wine – Part III


One of the most fool-proof methods of cooking wine is poaching. That is, simply simmering the food with wine as the liquid. You can poach vegetables, meat or fish. They are all good, but poaching goes great with fruit. It can render a marvelous dessert dish, as noted in the recipe below. Just simmer any substantial fruit (apples, peaches, plums, etc.) in a sweet wine. The wine can be can be a sweet sherry, Marsala, port or other. I’ve chosen pears, and Sauternes, a dessert wine from Bordeaux.

PEARS POACHED IN SWEET WINE

1 cup Sauternes
1 cup water
1 cup brown sugar
Rind and juice of 1 lemon
4 pears, peeled and cored
1 cup whipping cream
1 tablespoon pear brandy (optional)

1. In a medium pan, combine wine, water and sugar.
2. Add rind and juice of lemon . Simmer over low heat for 5 minutes.
3. Add pears into the syrup. This must be done immediately after the pears have been peeled and cored. Simmer pears for 10-15 minutes depending on ripeness.
4. Remove pears to a serving platter. Boil syrup over high heat until half has been boiled away.
Pour remaining syrup over pears.
5. Serve chilled with whipped cream flavored with pear brandy if desired.
Yield: 4 servings.

Reblog this post [with Zemanta]

Palibachi’s New York Cheesecake


My dear friend, Paul Goldstein, has live in Seattle for a few years now. But he’s just about had it. See, according to Paul, Seattle has no really good kosher delis. That’s right. Nothing in the vein reminiscent of his youth (and mine as well). No real New York style bagels or bialys, of stuffed kishka or derma, or even descent matzoh ball soup. Imagine that, loving in a place that has no genuine delis? Now, I’m sure Seattle is a wonderful town and, of course, it’s got great coffee houses, not to mention Rainier beer but, a place that doesn’t have a good old style deli? Well, I couldn’t live there. More than once I’ve had to ship Paul New York bagels and babka to keep him going.

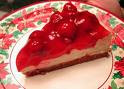
I can sympathize since I am a partisan of old style Yiddish cuisine in the Ashkenazi Eastern European tradition. But there’s more. Paul asserts that he can’t find a real danish in Seattle. By his account, if you drop a New York danish, it drops to the floor with a heavy thud. That’s a danish. In Seattle they float down like a feather. But what was the last stray for Pablo, was the cheesecake saga—or lack of it. He says the cheesecake in his area leaves a lot to be desired. Nothing like the genuine creamy concoction we get here. Paul’s cheesecake jones has gotten so bad he’s been forced to make his own cheesecake. And that’s the recipe that follows below. It’s based on an original recipe but with reduced sugar. And it’s pretty good. Even if you live on the East Coast and have access to good cheesecake, this recipe, if nothing else, is fun to make, and you get to eat homemade cheesecake. For a cheesecake addict, it doesn’t get better than that.

PALIBACHI”S NEW YORK CHEESECAKE (with or without pie filling)

9-inch spring form pan required

Shell ingredients:

1 cup flour

1/4 cup sugar

1 stick of butter

1 1/2 teaspoon grated lemon peel

1/4 teaspoon vanilla extract

1 egg yolk

Filing:

5 8-ounce packages of Philadelphia cream cheese. YES, YOU NEED FIVE!

5 eggs

1/2 teaspoon vanilla extract

2 teaspoons grated lemon peel

1/4 to 1/2 cup heavy or light whipping cream

3/4 cup sugar (works well with cherry pie filling, a nice contrast)

1 1/2 tablespoons flour

Cherry pie filling (canned or commercial is okay)

To make shell:

1. Preheat oven to 325 degrees

2. Melt butter in a small pot or pan, remove from heat. Add all the shell ingredients and mix together until thick. Remove bottom of spring form pan. Using about a 1/3 of the shell mixture, spread it over the entire bottom of the pan using your fingers and palm, covering the entire pan but no more than about 1/4-inch thick.

3. Place in oven and bake for approximately 10 minutes or until golden brown (while this is baking you can prepare the filling).

4. Remove and let cool.

5. Place ring around bottom making sure it is sealed properly. Spread the reminder of shell mixture around the ring using your fingers making sure ring sides and bottom are sealed (sides do not have to be thick).

Cheesecake Filling:

1. Soften the Philadelphia cream cheese packs. YES, YOU NEED 5! IT’S NOT A NEW YORK CHEESECAKE UNLESS YOU DO. Combine and mix in a bowl with the whipping cream. If you don’t have an electric mixer, a hand mixer works just as well if you first soften the cream cheese in the oven.

2. Add all other ingredients except cherry pie filling. Fill the spring form pan with the filling. If you are making a cherry cheese cake, pour just enough of the filling to cover the bottom of the pan then add the cherry pie filling. You can save a small amount to use as a large circle topping afterward if so desired.

3. Place in oven and bake for 30 minutes. Let it cool in the oven, and then let it cool further on the counter top. Place in the refrigerator (Paul states it is best eaten the next day—if you can wait).

Tembleque – Coconut Supreme

Those of us from a Caribbean heritage have a thing about coconuts. We drink the coconut milk, snack on coconut meat, mix it in our rum drinks, and use it in our cooking, mainly in our desserts. And the prime dessert dish of all is tembleque, or coconut custard. It’s rich, it’s creamy, it’s a delight. And a hell of a bother to cook. It’s the only recipe (apart from pasteles) in my tome, Puerto Rican Cuisine in America (Perseus Book Group), that takes time to prepare. But, believe it, my friends, it’s worth it.

First of all, to do the thing right, you need fresh, ripe coconuts. These can be acquired in any Caribbean, Asian or Indian market. You need to drain them, grate the coconut meat, cook it and strain it. Agreed. It’s time consuming. But it’s a hell of a lot better than the pre-packaged tembleque mix in stores, and much healthier. It doesn’t have all the preservatives or chemicals in it.

If you still don’t want to invest the time, you can shortcut by using canned coconut milk, which is readily available in most supermarkets. Omit the coconut part and use with the rest of the ingredients noted in the recipe given below. But, for the genuine taste of pure, luscious tembleque, nothing beats the original.

TEMBLEQUE (COCONUT CUSTARD)

2 large ripe coconuts
1/2 cup cornstarch
2/3 cup sugar
1/2 teaspoon salt
1 teaspoon vanilla extract
Ground nutmeg
Ground cinnamon

1. Pierce coconut (a big nail is best) and drain liquid into a small bowl. Reserve.
2. Split coconuts and remove white meat from shell. Separate the brown skin from coconut meat.
3. Break the coconut meat into pieces, rinse under cold water and grate finely.
4. Place grated coconut in a bowl. Add enough water to reserve coconut liquid so that it measures 3 1/2 cups. Bring liquid to a boil and add grated coconut.
5. Drain coconut in a colander or strainer, pressing with the hands to extract coconut milk into a bowl.
6. Heat one cup water. Add same coconut shreds as before and strain again into the same bowl that holds the coconut milk. Discard shreds.
7. In a large pot or saucepan, combine cornstarch, sugar, salt and vanilla. Stir in coconut milk, a little bit at a time and blend well.
8. Cook on moderate heat, stirring constantly with a wooden spoon until mixture thickens.
9. Reduce heat to low and stir until mixture boils.
10. Remove from heat and pour into 8 slightly wet, individual molds or a large round pan or mold.
11. Let cool and invert into molds, serving dish or platter. Sprinkle with nutmeg and cinnamon and serve.
Yield: 8 servings.

Reblog this post [with Zemanta]
Newer posts

© 2024 Oswald Rivera

Theme by Anders NorenUp ↑