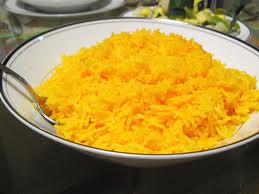
My friends marvel when I serve them rice pilaf or yellow rice dishes. Invariably they ask: what colors the rice? It’s a complex question, depending upon the dish. Fragrant colored rice has been in my culture since the beginning. It was the Spaniards who got the method from the Moors, when the Arabs introduced saffron as a flavoring and coloring agent in Southern Spain. Saffron is still the best thing around—but it’s expensive. If you can afford it, more power to you. All you do is add a few strands of the stuff to the rice while it’s boiling to get that great arroz amarillo (yellow rice) hue.
My parents came from the Greatest Generation (as it is called by some). So, during the Great Depression, they and their fellows developed equitable shortcuts to using safron (which they couldn’t get and, even if they could, they couldn’t afford it). Below are easy, ready to use alternatives that give rice whatever color you want; and also add to its flavor. I’ve used these alternatives, at one time or another, depending upon my financial condition, and it’s given me a marvelous rice dish every time.
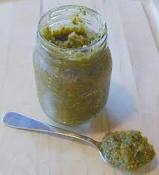
Achiote – This is simply annatto seeds cooked in vegetable oil or olive oil. It’s our favorite product for coloring food. You can find it in most supermarkets in 8-ounce jars. Annatto is the pulp of the tropical tree Bixa orellana; and annato dye is used in coloring some cheeses. To prepare: just cook 1 tablespoon annatto seeds in 1/2 cup olive oil, on low heat, stirring frequently for 5 minutes. During cooking, the oil will turn a bright orange-red. The longer the seeds steep in oil, the deeper the hue. Remove from heat, let cool, and strain into a glass jar or container. You can keep it in the fridge indefinitely. Use as you wish, from 1 to 3 tablespoons when cooking rice, depending on the color you want to attain.
Tomato Sauce and Tomato Paste – This will do when you don’t have annatto seeds. But, depending on how much you use, it will render a more reddish color to the rice. Now, experts in my family contend that tomato sauce will give a better color, while tomato paste will give a better flavor. It’s all a matter of personal preference. To prepare: cook 1/3 or more cup tomato sauce, or 2-3 tablespoons tomato paste, in 3 tablespoons olive oil. If you want to enhance the flavor, you can add 1 small chopped onion and/or 1-2 cloves finely diced garlic. When you reached desired consistency, add a couple of cups of rice. Stir to mix, add water, bring to a boil, lower heat, cover, and cook the rice as you normally would.
Tumeric – This spice is known as Indian saffron, since it’s widely used as an alternative for the more expensive saffron. You get it in the supermarket in the form of a dry root powder. It not only adds a custard-like yellow color to rice but it also impart a distinct flavor. Tumeric is extremely strong, and it gets stronger as it cooks. A little goes a long way. Be judicious in its use. As noted, it’s a powerful yellow dye, so try not to stain your apron or clothes with it while cooking. To use: just add 1 teaspoon (or more, but be careful) to two cups of rice when it comes to a boil. Cover and simmer as you normally would.
Dry mustard – That’s right, dry yellow mustard in the powdered form. I know. You’re thinking about mustard on hot dogs, burgers, etc.; but mustard, in its own right, adds great flavor and color to foods. Like tumeric, it tends to be strong. Figure it this way, you can substitute 1 teaspoon of dry yellow mustard for 1 teaspoon tumeric. Just add to rice when it comes a boil, cover, and cook as instructed.
Parsley – For green rice. Yes, it’s hard being green. But in rice it’s okay. Adds another dimension and flavor to the dish. Simple: take 1 bunch of parsley (I prefer the curly Italian type parsley), wash and chop finely (by hand, or in a food processor). Saute it in 2-3 tablespoons olive oil with a couple of finely chopped garlic cloves thrown in. To enhance the flavor you can even add a chicken bouillon cube, and (if you want) 3 tablespoons light cream. Add rice, water, and cook as you normally wood. It will give you deliciously green-hued rice.
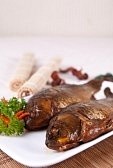
Black Rice (Arroz con Calamares) – This is rice cooked with squid or cuttlefish. The color comes from the dark color imparted to the grains as they cook with the squid in its ink. It’s a favorite in my crowd. The trick here is that the rice will come out darker if canned squid is used. 4-ounce cans of squid in their ink can be found in most supermarkets or Asian and Caribbean stores. To prepare: saute, in 2 tablespoons olive oil, 1 green bell pepper (cored seeded and chopped), 1 small onion (chopped), and 1 clove garlic (finely minced). Add 1/2 cup tomato sauce, and 1 chicken bouillon cube. Stir in 3 cans squid in this ink plus 6 pimento stuffed Spanish olives. Stir in 2 cups rice, water to cover by about 1/4-inch, season with salt and pepper, bring to a boil, and cook until liquid is absorbed (about 20-25 minutes).
There you have it, friends, different and varied ways to add delicious color to your rice dish. Experiment, see which one you like best—and enjoy!